This article may contain affiliate / compensated links. For full information, please see our disclaimer here.
Calling all mommies out there who are wondering how to start a mom blog! Did you know that starting a mom blog is one of the best ways to share your parenting tips and tricks with the world… while bringing in a decent side income?
Some mom blogs regularly pull in more than $2,000 a month while they work on it part-time. How would that extra income help out around the house?
A mom blog is the perfect place to share your parenting skills, your scrumptious kid-friendly recipes, and how you balance the wild ride of motherhood with everything else going on in life.
Plus, mom blogs can be the ultimate side hustle, allowing you to make money on the side even if you’re busy with things at home.
I know it can be slightly intimidating to think about starting a blog (especially when you have little ones clinging to your ankles) but let me assure you that if you follow the five steps laid out in this article, you’ll have a blog up and running by dinnertime.
Keep reading to find out the 5 steps you need to take to start your mom blog, plus additional resources to help you through the process of setting up your mom blog! Trust me, it couldn’t be easier.
How to Start a Mom Blog in 5 Steps
- Step #1: Choose a Mom Blog Topic
- Step #2: Decide on a Mom Blog Name
- Step #3: Register Your Domain and Get Hosting
- Step #4: Set Up Your Blog on WordPress and Launch It
- Step #5: Start Blogging!
- Bonus: Make Money With Your Mom Blog
Without further ado, here’s everything you need to know about how to start a mom blog in 5 simple steps.

Step #1: Choose a Mom Blog Topic
First thing’s first… you have to decide on a mom blog topic. The reality is that there are tons of mom blogs already on the internet, making it challenging to stand out if you choose to just start a general mom blog.
This is why it’s so important to decide on a super-specific topic or niche to allow your mom blog to stand out in a sea of all the other ones.
Here are some examples of mom blog niches:
- Healthy cooking for little kids
- Working mom tips and tricks
- Parenting teenagers
- Single mom life
- Stay-at-home mom advice
- Motherhood fashion
As you can see, there’s a gigantic variety of mom blog niches to choose from… and this is barely scratching the surface!
No matter what you settle on, having a distinct niche will help relevant readers find your blog. It also shows Google that you have authority on a certain topic. When this happens, your articles will start to rank higher on search engine results, driving tons of traffic to your blog. All of this comes from having a well-defined niche.
Have a think about where your motherhood strengths lie and the topics that interest you the most. From there, you can brainstorm a mom blog niche that works best for you.
Remember, you can always start really niche then eventually begin to branch out to other related topics.
If you need any additional help with the process, check out this article: The Ultimate Guide to Finding a Profitable Blogging Niche.
Step #2: Decide on a Mom Blog Name
Next, you’ll want to come up with a catchy mom blog name.
This step should come after deciding your niche so that you can include related keywords in your mom blog name to show readers (and search engines) what your blog is about.
Take some time to make a huge list of words related to motherhood, raising kids, and your mom blog niche. From there, you can begin to pair words together to try and come up with a creative name.
Feeling stuck coming up with a mom blog name? Check out some existing mom blog names for inspiration.
Here are some examples:
- A Mom’s Take
- Blush, Belly and Babies
- Wondermom Wannabe
- Confessions of a Single Mum
- Nerdy Mama
You can find a giant list of more names, along with original mom blog name ideas in this article.
To make your blog name memorable, try to keep it short, sweet, and simple to spell. Most blog names are only between 2 to 4 words!
It also helps to use techniques like alliteration, rhyming, and puns to have your mom blog name stick out in people’s minds.
To test out how memorable your mom blog name is, you can use the “mom test”.
The mom test is where you call up your mom and tell her the name of your blog. If she says “What? What was that? Can you spell it out for me?”, you know that your blog name isn’t that memorable.
Still need some help coming up with a name for your mom blog? Try out a blog name generator! These online tools allow you to plug in keywords and returns different blog names relevant to your niche.
We’ve actually developed our own blog name generator to make the process that much easier.
If you have a mom blog name idea already, plug it into the widget below to see if it’s available:

Step #3: Register Your Domain & Get Hosting
Once you settle on a mom blog name and know that it’s available, it’s time to get your domain name registered and hosting set up.
A domain name is the actual URL of your blog. For example, our travel blog domain name is www.adventureinyou.com. Whatever you choose as your mom blog name will end up as your domain name too!
You can register domain names on their own for about $10 per year or you can choose a hosting provider that has a domain name included for free… like Bluehost! (More details on how to get a free domain name below.)
Mom Blog Hosting Recommendation: Bluehost
When it comes to hosting, it doesn’t get much better than Bluehost, the most affordable and trusted hosting provider out there.
Note: If you hope to make money with your mom blog, we recommend purchasing hosting so that you can start a self-hosted blog. This means that you have complete ownership and control of your blog and are able to use different monetization strategies like affiliate marketing and advertising.
While you can start a blog on a free platform like Wix or Blogger, there will be tons of fine print as to what you can do, especially surrounding making money.
Besides the reasonable pricing, Bluehost also has stellar customer support who can help with any problems you encounter, as well as a free 30-day moneyback guarantee to make sure that they’re right for you.
Some other perks of starting a blog with Bluehost are:
- Free domain name included for the first year
- Ability to get hosting before deciding on a blog name
- 24/7 support
- Ultra compatible with WordPress
- Best value for money
We are super confident in recommending Bluehost as they’re what we use ourselves. Since switching hosting providers to Bluehost, we couldn’t be happier which is why we recommend every blogger sign up with them for a self-hosted blog.
While they’re already super affordable, you can take an extra 63% off hosting through Bluehost with our Blogging Fast Lane discount. This means that you can start a blog for just $2.95 a month… that’s the price of a cup of coffee!
How to Set Up Hosting: Video
I know that getting hosting set up can be a little confusing, so we put together this video tutorial to walk you through everything you need to know.
Keep reading for step-by-step written instructions, too!
How to Set Up Hosting: Step-By-Step Instructions
If you’d rather follow along with images instead of a video, you’ll be able to get your hosting set up with these step-by-step directions.
First, start by clicking the button above and you’ll be redirected to Bluehost. After that, click “Get Started Now” on the Bluehost landing page and you’ll be able to get the hosting process started.
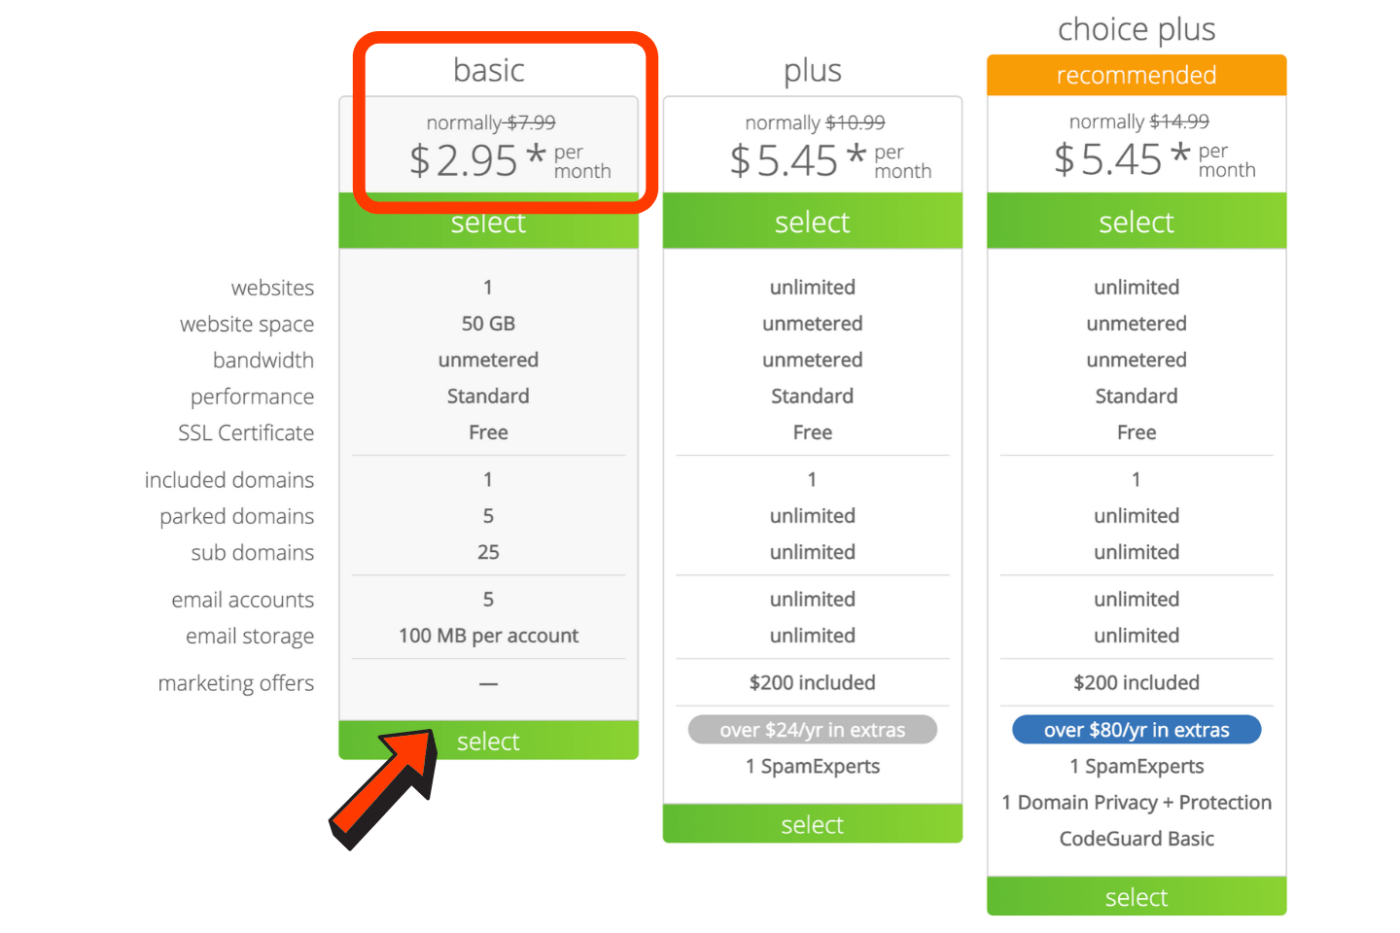
You’ll be brought to the plans page, where you’ll be able to see that Bluehost offers 3 packages: Basic, Plus and Prime.
For mom bloggers on a budget, the Basic plan will do the trick for you. Plus, with Bluehost, you can upgrade plans at any time.
Once you decide on what plan you’d like to start with, click “Select” to continue on.
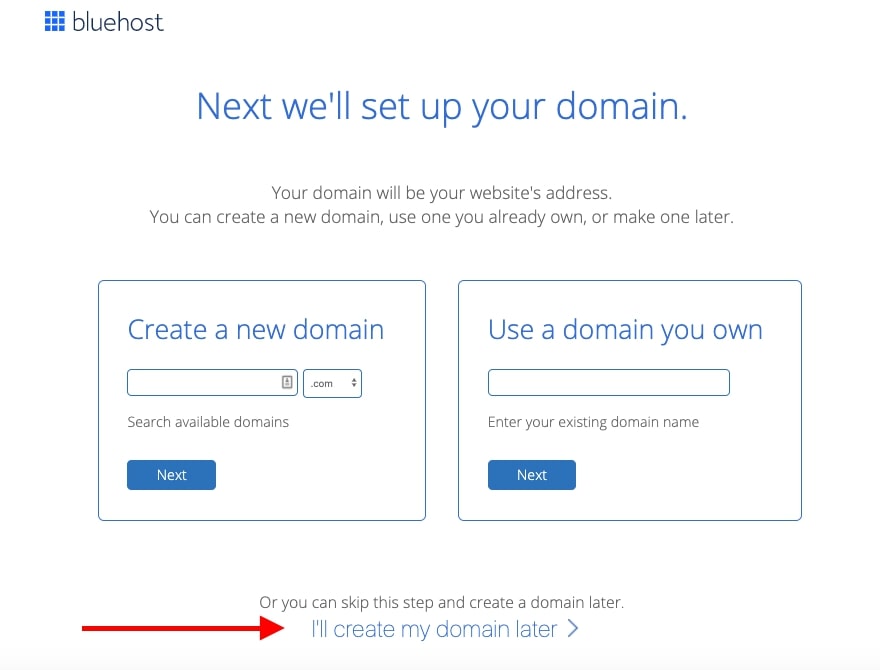
The next step is registering your domain name. As I mentioned before, when you purchase hosting through Bluehost, you get a domain name included for free for the first year!
If you’ve decided on your mom blog name, go ahead and insert it into the “new domain” box.
Note: We recommend getting a domain that ends in a .com address. It’s easiest for Google to read .com addresses and they have the most authority, which is why they’re the best choice for bloggers.
Stuck coming up with a mom blog name? That’s okay!
With Bluehost, you can move on to the next step even if you don’t have a domain name in mind. All you have to do is click “I’ll create my domain later” and you’ll be able to move on to the next step.
Next, simply create your Bluehost account and pay. Be sure to go in and review your selected package to make sure it’s what you want, and decide if you want to add on any extras to go along with it.
Remember, for most bloggers, the Basic plan will work for you. If you get it for 36 months, you have the lowest monthly rate ($2.95). Plus, your blog will be live online for 3 years!
Bluehost does have the option of shorter plans, but keep in mind that they’re more expensive on a monthly basis.
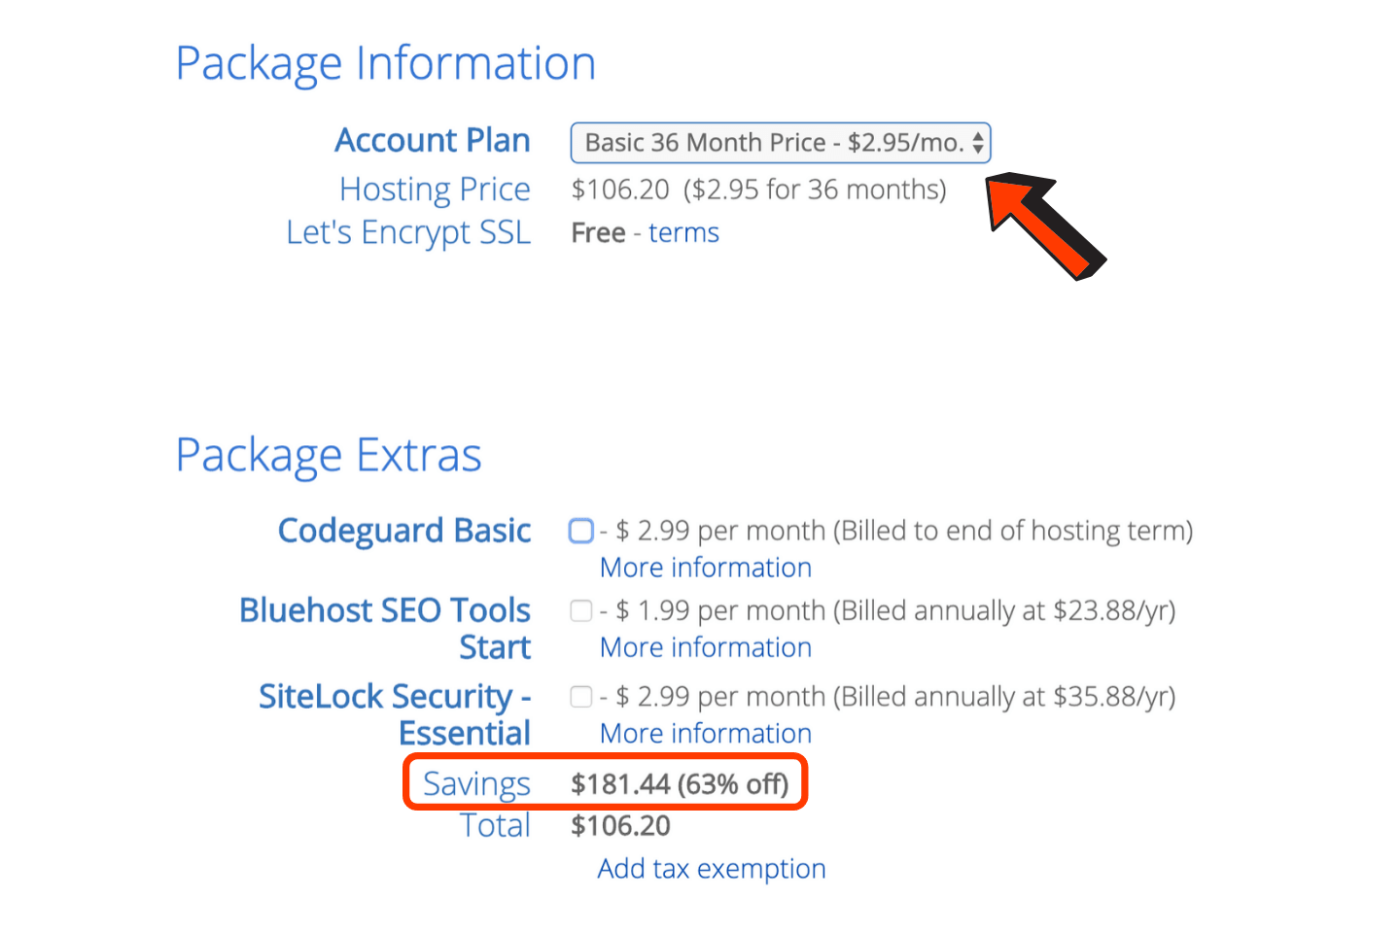
Check it out: with our discount, you can save $181.44 on 3 years of hosting!
Once you’ve double-checked everything, you can go ahead and pay. There, you’ve got your hosting all set up! Now it’s time to get your blog live.
Step #4: Set Up Your Blog on WordPress & Launch It!
Hosting is what gives your blog a place to live on the internet, but you’ll still need a content management system to customize your blog and publish content.
This is where WordPress comes in!
Install WordPress
WordPress is the most popular content management system for bloggers. In fact, about a third of the internet is actually run via WordPress.
It’s dependable, pretty easy to use, and has tons of support forums in case you run into any issues.
Best of all, Bluehost is completely compatible with WordPress, creating a super simple set-up process to get your blog online.
Note: It’s important to know the difference between WordPress.org and WordPress.com. WordPress.org is a free content management system that allows people to start self-hosted blogs. On the other hand, WordPress.com is a free blogging platform with its own hosting.
You can start a blog for free on WordPress.com but your domain name will look something like: www.myblog.wordpress.com. For blogging purposes, you should definitely stick to WordPress.org.
To get your blog set up, first you’ll have to install WordPress.
You can do this by going to your Bluehost dashboard, navigating to “My Sites” on the sidebar, and clicking the “Create Site” option.
From there, Bluehost will guide you through the steps to install WordPress. After following the steps, choose your domain from the dropdown menu. That should get WordPress installed and your blog ready to roll!
Pick a WordPress Theme
Once you have WordPress installed, the fun really begins. To get your mom blog going, first you should choose a theme to build your blog around.
WordPress themes are basically website templates built by developers for people to use. This means that even if you don’t know an ounce of coding, you can get your blog looking professional and beautiful with the use of a WordPress theme.
There are thousands of WordPress themes out there, many of which are free.
However, we recommend investing in a premium theme right off the bat so that you have ultimate control over the look and feel of your blog. This will save you so much time down the road as premium themes are much simpler to deal with compared to free ones.
Premium themes typically range from $10 to $60, with the odd one that’s a bit more expensive.
One of our favorite premium themes is Divi which comes with a visual page builder, perfect for mom bloggers who already have a site layout in mind.
With Divi, you can get your blog looking exactly the way you imagined with very little hassle. Not to mention, there are more than 800 templates to choose from and import onto your blog… talk about convenience!
After finding a theme that looks good to you, you can go ahead and import it into your blog and start to customize it.
Customize Your Mom Blog
So you’ve picked out the perfect theme and gotten it onto your blog… now it’s time to make it your own!
Customizing your site is the fun part, where you can turn a generic theme or demo into an awesome mom blog.
Start out by including and modifying all the necessary elements like a homepage, “About” page, and contact information. From there, you can continue to build unique elements to round out your blog.
Don’t be afraid to let your personality shine through when you customize your blog. Choose an amazing color scheme, upload engaging images, and insert personal information to give your readers insight into the mom behind the screen.
While customizing your blog, be sure to create a catchy blog bio that you can use throughout your website. It’s also important to create a simple navigation experience so that users can find exactly what they’re looking for.
You may also want to consider creating a header and a footer – elements included in many themes – for quick information about your mom blog.
As a beginner blogger, it can be so tempting to get every little detail just right but remember, there will be a lot more time for customization down the road. Get your blog to a place where it’s good enough to start publishing content and then move on.
You’ll always have time to go back and tweak things later on!
For tips on customizing your blog, this article has everything you need to know about blog design.
Must-Have Plugins for Mom Blogs
WordPress has made blogger’s lives so much easier with plugins. Plugins are little bits of code that can extend the functionality of your blog and allow you to customize things even further.
And let me just tell you, there’s a plugin for pretty much everything.
Here are some of the top plugins for mom bloggers:
- Yoast SEO: Edit your meta title and descriptions with this plugin. Yoast SEO also gives optimization suggestions for your content and other tips to boost your on-site SEO.
- Monster Insights: This plugin creates a Google Analytics dashboard right in WordPress so you can see your blog metrics without leaving your site.
- Monarch: If you want readers to be able to share your content across different social platforms, this plugin allows them to do so. It’s also highly customizable so you can make it fit your site just right.
- Modern Event Calendar: Do you plan on holding events as a mom blogger? This plugin allows you to create and manage events right from your blog.
- WP Ultimate Recipe: To share your kid-friendly meals with the world, this plugin allows you to create recipe cards for your blog.
There’s a gigantic plugin library available to WordPress users. If you feel like browsing it to see all that plugins can do, simply go to your WordPress dashboard and click “plugins” on the sidebar.
Step #5: Start Blogging!
Now that you’ve gotten your mom blog set up, all that’s left to do is, well… start blogging!
Remember that more than anything, content is king when it comes to building a successful blog.
You should focus most of your efforts on writing articles that your audience is going to find valuable. This is how you rope them in and get them to come back for more!
Initially, it can be challenging to write a blog post that people will keep reading, but all it takes is a bit of practice. Be sure to pair your articles with catchy headlines and you’ll be off to a great start!
If you’re feeling stuck writing blog content, first start by creating a blog post outline to organize your thoughts. When you write from an outline, you’ll find that there’s a lot more structure to your article since you have a roadmap of where you’re taking it.
Right off the bat, you should start to build out your content and try to get your articles ranking on Google using simple SEO. Doing this creates a great foundation for you to build your mom blog empire!

Make Money With Your Mom Blog
Now you must be wondering how to start a mom blog and make money from it. Well, there are lots of ways that moms can make money from their websites!
You can create digital or physical products to sell to your audience, create online courses, start a membership website or run display ads. The possibilities are limitless.
That being said, it’s important to keep in mind that blogging isn’t a get-rich-quick scheme. In fact, it can take a little while to generate an income from your blog. But it’s totally possible!
Time, patience, and dedication are required qualities on the road to mom blogging success.
If this is a goal of yours, begin building trust with your audience as soon as your blog launches. When the time comes to monetize your blog, your readers will already be inclined to spend money based on your recommendations.
Interested in learning more about how to grow and monetize your mom blog? Be sure to sign up for our free training where we walk you through just that.

So what do you think?
The process of setting up a mom blog is so much easier than you’d expect. All it takes is about an hour in front of a computer and the drive to make it happen.
From there, you’ll have a blog to share your mommy wisdom and help other moms far and wide.
What kind of mom blog did you start? Drop us a comment below to let us know!
Like this Article? Pin it!