This article may contain affiliate / compensated links. For full information, please see our disclaimer here.
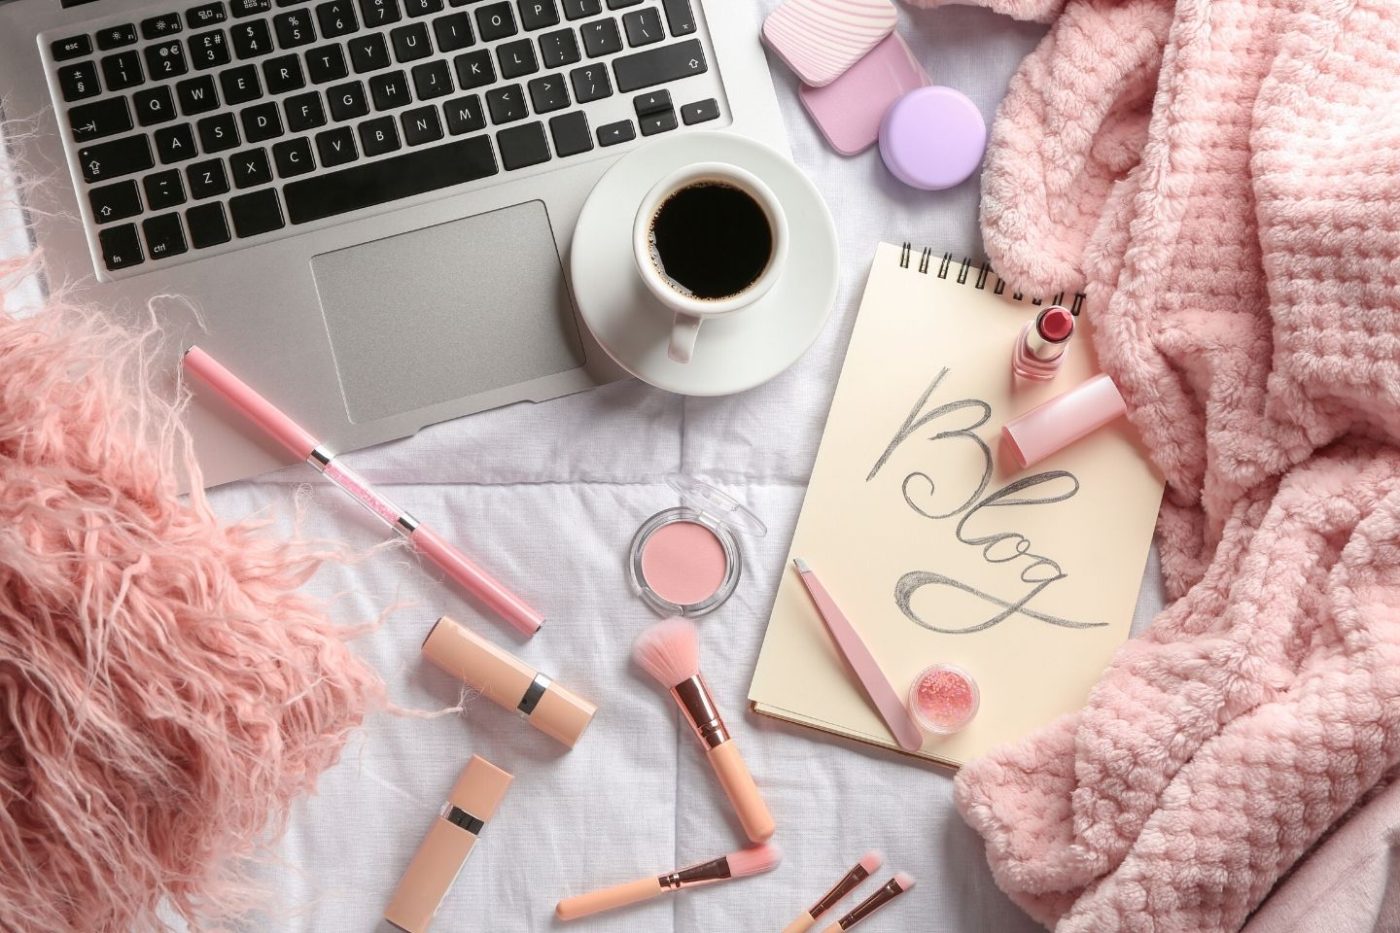
Do you have beauty knowledge you want to share with the world? An unbeatable skincare routine that guarantees a clear complexion? No-fuss hair styles that you wish to teach others? Dozens of makeup palettes you’re dying to review? If any of this sounds like you, it may be time to start a beauty blog.
Starting a beauty blog is one of the best ways to share your beauty hacks with more than just your vanity mirror. A beauty blog is an amazing way to get your individual style out in the world, while helping people at the same time.
There are tons of people like me who are completely clueless about the beauty industry and overwhelmed by all the products out there to help me look and feel good. I struggle with just getting my makeup done!
So we turn to people like you for the answers. By creating a beauty blog, you can help loads of people searching for explanations online while doing what you love.
And did I mention that you can actually profit from a beauty blog, too? There are so many beauty bloggers out there who actively rake in 5 figures a month from helping other people succeed in the beauty realm.
Whether it’s makeup, skincare, hair styles, nail painting, or anything else that’s part of your beauty blackbook, it’s time to take to the internet to profit from your passion.
In this article, I cover everything you need to know about how to start a beauty blog so that you can turn your passion for looking good into a full-blown business.
How to Start a Beauty Blog in 5 Steps
- Step #1: Decide on Your Beauty Blog Topic
- Step #2: Choose a Beauty Blog Name
- Step #3: Register Your Domain and Get Hosting
- Step #4: Set Up Your Blog on WordPress and Launch It
- Step #5: Start Blogging!
- Bonus: Make Money With Your Beauty Blog
If you’ve been tinkering with the idea of starting a beauty blog, you’re in the right place because here, I lay out 5 foolproof steps to get the beauty blog of your dreams up and running.
Step #1: Decide on Your Beauty Blog Topic
Before you can start blogging, you have to decide what you actually want to blog about! If you’re reading this article, it’s a safe bet that you want to blog about beauty, but what specifically?
There are heaps of beauty blogs already on the internet, so it’s important to choose a very narrowed down topic to center your blog around. Choosing this topic, or niche, will go a long way in making your beauty blog stand out online.
For example, some beauty blog niches may be:
- Everyday makeup tutorials for millennials
- Bridal hair do’s and don’ts
- Natural skincare products
- Beauty on a budget
- Makeup tips for working moms
As you can see, each of these topics is pretty specific and aimed at a certain type of reader.
Beyond just attracting a specific set of readers to your beauty blog, having a well-thought-out niche also helps in terms of getting your blog read by Google.
No, there’s not actually a tiny human sitting inside of Google reading all of the articles published online. Rather, there’s a complex algorithm that determines what each website is about and how relevant it is to search terms.
If you have a specific niche and write tons of content surrounding it, Google will be able to better understand what your blog is about. This shows that you have authority on the subject, which in Google’s mind is a good enough reason to rank your articles higher on search engine results.
Having a solid blog niche is so important and is the first step to getting your beauty blog live.
For more advice on choosing a beauty blog topic, check out our article: How to Choose a Profitable Blogging Niche.
Step #2: Choose a Blog Name
Moving right along, after you choose a niche for your beauty blog, it’s time to think about a name.
When naming your beauty blog, you want to come up with something that people will remember – a name that will stick out in people’s minds.
As you brainstorm possible names for your beauty blog, try to think of some keywords related to your niche. If you can include these keywords in your beauty blog name, readers (and Google) will be able to know what your blog is about right off the bat.
It also helps to include fun strategies like rhyming, alliteration, or puns into your beauty blog name. These tricks go a long way in coming up with a catchy beauty blog name.
If all else fails and you’re having a bit of a brain block, look to those who have come before you!
What are some existing beauty blog names that you really like? What about them do you like? Can you emulate this quality in a beauty blog name of your own?
For example, these beauty blog names have a particularly nice ring to them:
- Shades of April
- Brooklyn Beauty Queen
- Politics of Pretty
- Dizzy Brunette
- The Good Glow
- Brown Beauty Talk
As you can see, each of these beauty blog names is short, sweet, and to the point while still being catchy enough for people to remember. You can check out some more beauty blog name examples as well as original ideas in this article.
If you’re still feeling stuck when it comes to naming your beauty blog, you can always try out a blog name generator! These online tools allow you to plug in a keyword, and in return spits out different blog name ideas.
We actually created our own blog name generator to make the process that much easier.
Once you start to think of some beauty blog names, plug them into this widget to see if they’re available:
Step #3: Register Your Domain and Get Hosting
After you decide on a blog name, you can actually start to get your beauty blog set up! To do this, you’ll need to register your domain name (that’s the actual URL of your beauty blog) and get hosting.
On their own, domains typically cost around $10 per year, but if you keep reading, we will give our top recommendation on how to get this for free.
Note: Trying to build your beauty blog empire? You’ll need a self-hosted blog for that. It’s possible to start a blog on a free platform like Wix or Blogger, but you’ll be bogged down by tons of terms and conditions preventing you from making the most out of your blog.
That’s why we recommend every blogger get hosting so that they have complete control over their blog and content, and can truly turn it into a business if they’d like.
Bluehost: Beauty Blog Hosting Recommendation
To start a self-hosted blog, it doesn’t get much better than the hosting provider, Bluehost. Bluehost is not only the most trusted hosting network online, but the most affordable too, making it perfect for any kind of blogger from novice to advanced.
In fact, we use Bluehost ourselves and couldn’t be happier with them!
Some reasons to love Bluehost (besides the unbeatable price) are:
- Great 24/7 customer service
- WordPress compatible
- Best value for money (it’s the most affordable hosting for beginner bloggers!)
- Can get hosting before deciding on a blog name
- Free domain included in the first year
Did you catch that last point?
With Bluehost, you actually get a domain name included for free for a year! Signing up with Bluehost really streamlines the blog set-up process as they have everything you need right on their platform.
Plus, they also have a free 30-day moneyback guarantee so that you can make sure that they’re right for you.
When you sign up with our discounted link, you also enjoy 63% off the hosting price, which brings the cost of starting a blog down to just $2.95 a month!
Video Tutorial: How to Set Up Hosting
We’ve made the process of getting hosting as simple as possible with this video, where we walk you through everything you need to know, step by step.
Keep scrolling for written instructions with images!
Step-By-Step Instructions: How to Set Up Hosting
First, click here to navigate to Bluehost’s homepage. From there, you’ll be able to click “Get Started Now” and check out the different plans that Bluehost offers.
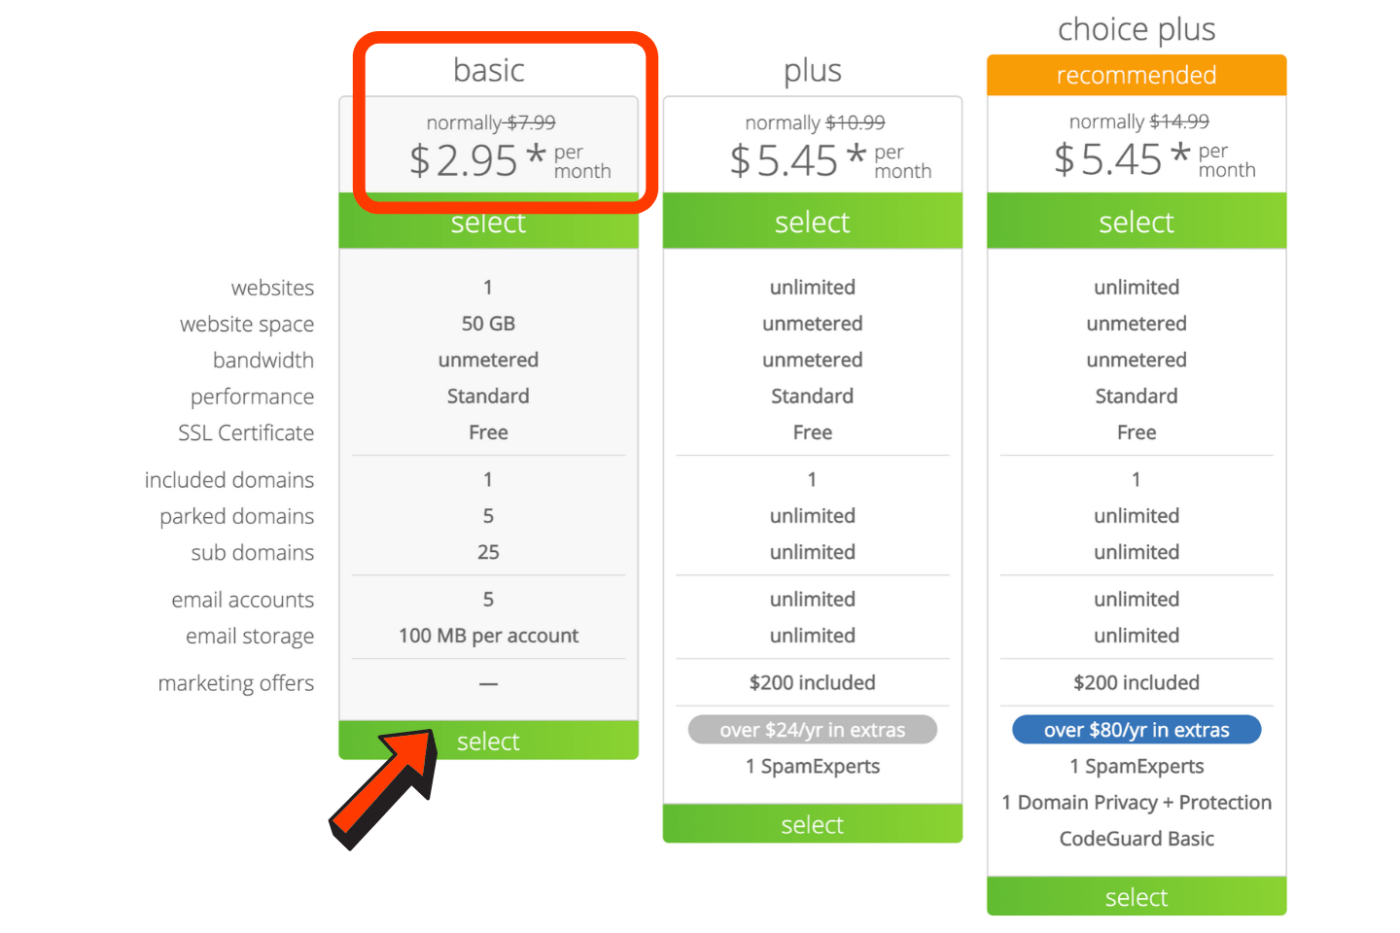
Bluehost has 3 different plans to choose from: Basic, Plus and Prime.
For beauty bloggers on a budget, the Basic plan will suit your needs just fine. You can also upgrade plans at any time with Bluehost, so don’t be afraid to start with Basic for the time being.
After deciding which plan is best for you, click “Select” and you’ll be brought to the next step.
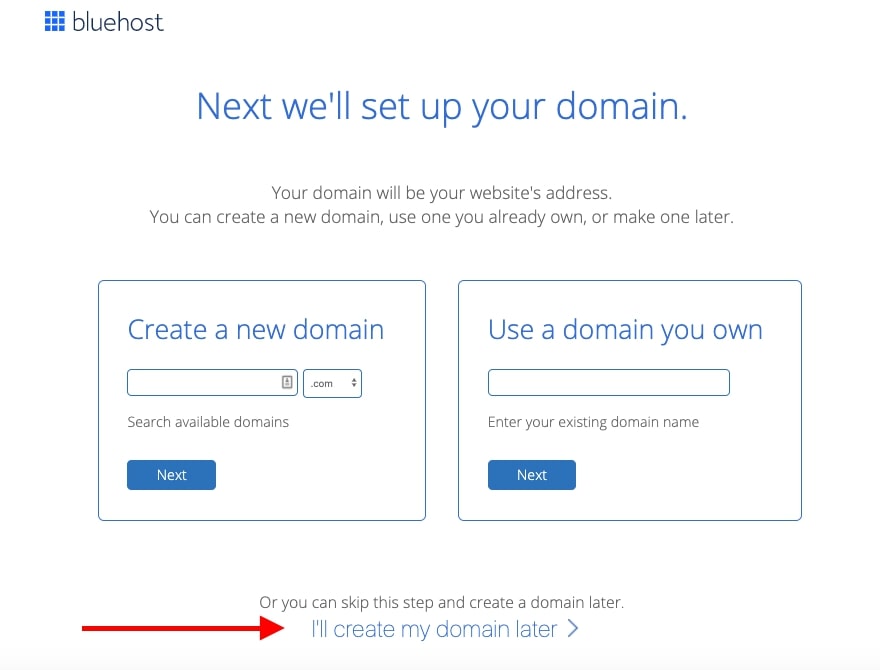
Once you pick out a plan, it’s time to register your domain name. Remember, with Bluehost, you get your domain name included for free for the first year!
If you already have a beauty blog name picked out, type it into the “New Domain” box and click “Next”.
Note: During this step, you’ll notice a dropdown menu with different website endings. We highly suggest you stick to a .com address which has the most authority online.
Don’t have a solid beauty blog name yet? That’s okay, too!
Just click “I’ll create my domain later” and you’ll be able to proceed with the process.
Now you’ll get to create your Bluehost account, review your package, and pay.
Be sure to look things over carefully to make sure that you’ve chosen the right plan. This is also the time when you get to choose extras to add on, like additional site security or spam protection.
Keep in mind that the Basic plan is the best option for most bloggers and it gets you 36 months of hosting. That means your blog will be live for 3 years without you having to worry about getting hosting again.
If you’d rather opt for a shorter plan, Bluehost has those too but they’re more expensive on a monthly basis.
Here’s what the Basic plan review will look like:
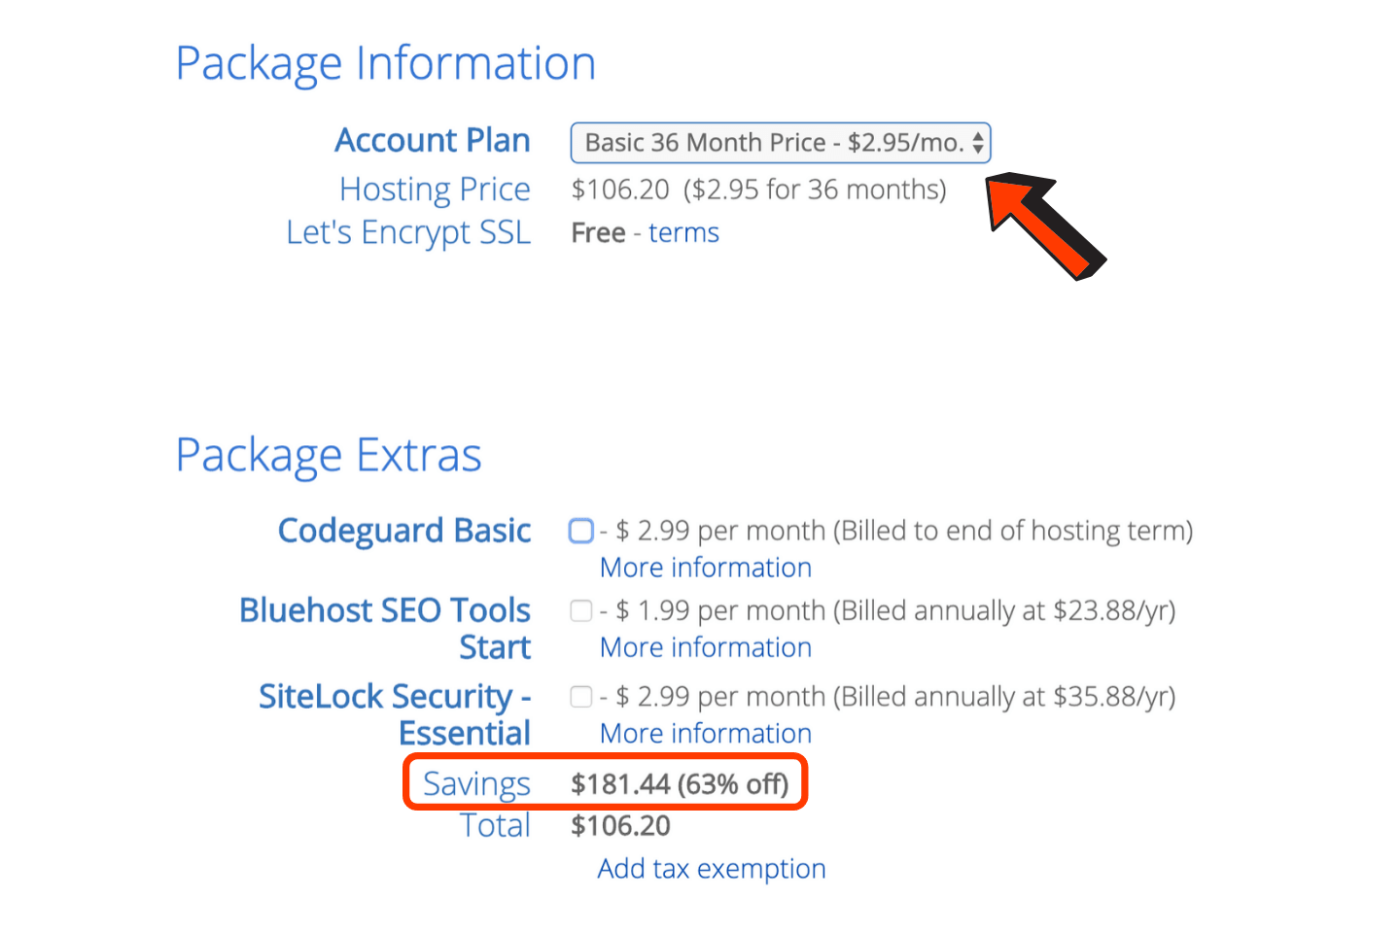
As you can see, our Bluehost discount saves you a whopping $181.44… for 3 years of hosting!
After everything looks all right to you, submit your payment and voila! You have hosting for your blog.
Step #4: Set Up Your Blog on WordPress and Launch It
Next, you’ll have to get your blog set up on a content management system so that you can make it your own and actually start publishing articles.
Install WordPress
When it comes to content management systems, you’ll be hard-pressed to find a better fit for bloggers than WordPress.
This is by far the most popular option to start a blog, and with good reason. You can do just about anything with WordPress (not to mention it’s free). And since so many people use it, there are plenty of support forums if you run into any problems along the way.
Bluehost is also designed to be perfectly compatible with WordPress so it’s a total breeze to get your beauty blog set up in a jiffy.
Note: Keep in mind that there are two WordPresses: WordPress.org and WordPress.com. WordPress.org is the free content management system I refer to in this article. It’s a place where people can start self-hosted blogs and build a business based on their website.
When you start a blog on WordPress.com, your domain name will look something like “www.myblog.wordpress.com” and comes with plenty of restrictions on what you can do. That’s why we recommend sticking to WordPress.org for starting your beauty blog.
To install WordPress for your beauty blog, head to your Bluehost dashboard, select “My Sites” from the sidebar and hit the “Create Site” option.
Then, Bluehost will guide you through how to install WordPress. At the end, you’ll be able to choose your domain name from the dropdown menu and then WordPress will be ready to go for your blog!
Choose a WordPress Theme
Now for the part you’ve been waiting for: making your beauty blog your own.
This starts with picking out the perfect WordPress theme to build your website around.
WordPress themes are pre-built website templates created by developers. This saves bloggers so much time and effort when it comes to creating your blogs as these templates do all the hard work for you!
You just have to pick a theme that looks good to you, import it to your blog, and then edit the theme to make it custom to your purposes.
There are about a zillion WordPress themes out there to choose from, so it’s basically guaranteed that you’ll find one that has the right look and feel that you’re looking for.
However, you’ll quickly find that not all themes are created equally.
There are lots of free WordPress themes out there, which are great for starting a blog on a budget, but this means you’ll sacrifice a good deal of customization control. Free themes don’t cost anything but are super limited in what you can do to them.
On the other hand, there are premium themes which go for between $10 to $60 and they allow you to do pretty much anything you’d like to them. With premium themes, you’re granted way more customization control so that you can edit everything down to the very nitty gritty details.
We recommend springing for a premium theme right off the bat because it’ll save you lots of time, effort, and struggles when it comes to setting up your blog.
To save you the time, we’ve sorted through the thousands of themes out there and have a jumbo list of the best lifestyle blog themes. While they’re not specific to beauty blogs, most of them are general enough and suitable to create the beauty blog of your dreams.
When you find a theme that looks right to you, all you have to do is import it onto your blog and then you can start customizing it!
Customize Your Beauty Blog
Now’s your chance to really infuse your personality into your beauty blog. After importing your theme, you’ll get to customize every aspect so that it fits your brand and aesthetic.
Customizing a theme can be a little overwhelming because there’s so much to choose from. I suggest starting by adding all the necessary elements to your blog and going from there.
Some things to think about right away are your:
- Homepage design and what you want it to look like
- Blog page so that your articles have a place to live
- Blog bio, about page and contact info – What should your readers know about you?
- Additional elements like a header, footer, navigation menu and sidebar.
After getting the basics down, then start to think about things like your color scheme, font, and how much white space you want to leave on the page.
Round everything out with captivating images and engaging text and there ya go… your beauty blog is ready for the masses!
Note: When setting up a new blog, it can be extremely tempting to spend hours (or days or weeks or months) trying to get things looking exactly the way you imagined. But there are more important things to do if you want to be a successful beauty blogger!
Simply get your blog to a place where it’s good enough to start posting content and then go back in later to tweak the things you missed.
Must-Have Plugins for Beauty Blogs
Besides themes, developers have also granted us the gift of plugins. Plugins are little bits of pre-made code that allow you to expand the functionality and customization of your blog even further.
You can find a plugin for just about anything, from the technical aspects of running a website to more fun design options.
When it comes to starting a beauty blog, these are the plugins we recommend using:
- Yoast SEO: Edit the meta titles and descriptions of your articles with this plugin. Yoast also gives super helpful suggestions on how to improve your on-site SEO.
- Pin It Button: Allow your readers to add any image on your blog to their Pinterest page with this plugin.
- Monster Insights: Integrate your Google Analytics dashboard with WordPress by installing Monster Insights. This way you can check site metrics without ever having to leave WordPress.
- Smash Balloon Social Photo Feed: Show off your Instagram feed right on your blog with this plugin. There are lots of options for formatting and placement so you can get things just right!
- WordPress Popular Posts: Display more posts for your audience to read with this plugin. You can add popular posts to the sidebar, at the end of articles or anywhere else you’d like to give options to users.
There is an enormous plugin library so definitely give it a look through to find whatever else you may need to customize your blog with!
You can find plugins by going to your WordPress dashboard and clicking “plugins” on the sidebar. Then, you can browse, search for, and install plugins. Just be sure to hit “activate” when you’re ready to use them!
Step #5: Start Blogging!
And finally, the moment you’ve been waiting for… it’s time to start blogging.
While it’s nice to have a blog that looks good, what matters more than anything in blogging is the content you produce.
There is nothing on your blog that is more important than your articles! Remember this going forward, as it’s so easy to get swept away by the millions of other things that come with starting a website and a business.
Rather than becoming too caught up with vanity metrics such as likes and follows, focus your efforts on writing kickass content that your readers will love. Think about writing articles that people will keep on reading and constantly providing value to your audience.
It also helps to learn some basic SEO (search engine optimization) so that you can get your articles ranking on Google and have the organic traffic roll in.
Keysearch is a super affordable tool that’s awesome for keyword research. They have both yearly AND monthly plans. If you would like to try the tool, use the coupon code “FASTLANE” for a discount!
Remember, to build a beauty blogging empire, it all goes back to the content you create. If you can publish articles that your audience finds valuable, they will come back time and time again to read your words and trust your suggestions.
When you’re ready to start blogging, check out these articles that could help you along the way:
Make Money With Your Beauty Blog
Now once you have your beauty blog all set up and you’re publishing your awesome content, you can begin to think about how to make money with your beauty blog.
There are lots of methods to do this and it just depends on how you want to spend your efforts!
You can create digital products to share with your readers, jump on the affiliate marketing wave, start an online course to share your knowledge or expertise… you can even offer freelancing or online services to people interested!
Let’s just say that the possibilities are endless when it comes to strategies for making money with your blog.
Just remember that it’ll take some time to earn an income with your beauty blog… it’s not something that happens overnight. However, it’s totally possible. Just take all the successful beauty bloggers out there as proof!
You can make money with your beauty blog so long as you have the right mindset and dedication to make it happen.
If you want to learn more about how to grow and monetize your beauty blog, check out our free online training where we walk you through this process, and more!

Now that you’ve made it to the end of these 5 steps, you should realize that anyone can start a beauty blog, including you! You just need some drive and motivation… the rest will fall into place.
My biggest tip for starting a beauty blog is to be patient with yourself. Starting a blog is a new skill, so give yourself the time to learn the ins-and-outs of it. Once you do, the rest of your blogging experience will be breezy.
Good luck!
Like this Article? Pin it!