This article may contain affiliate / compensated links. For full information, please see our disclaimer here.
Starting a blog can be a bit intimidating. You open up your computer, log onto the web and then what? Where do you go from there?
If you’ve had this feeling, please know that you’re not alone.
I was in your position once, sitting on my couch, staring at the screen and wondering exactly where to begin.
Being one of the least tech-savvy people ever, I had no clue how to get started blogging, let alone how to build one from scratch… but luckily, I didn’t let that fear stop me.
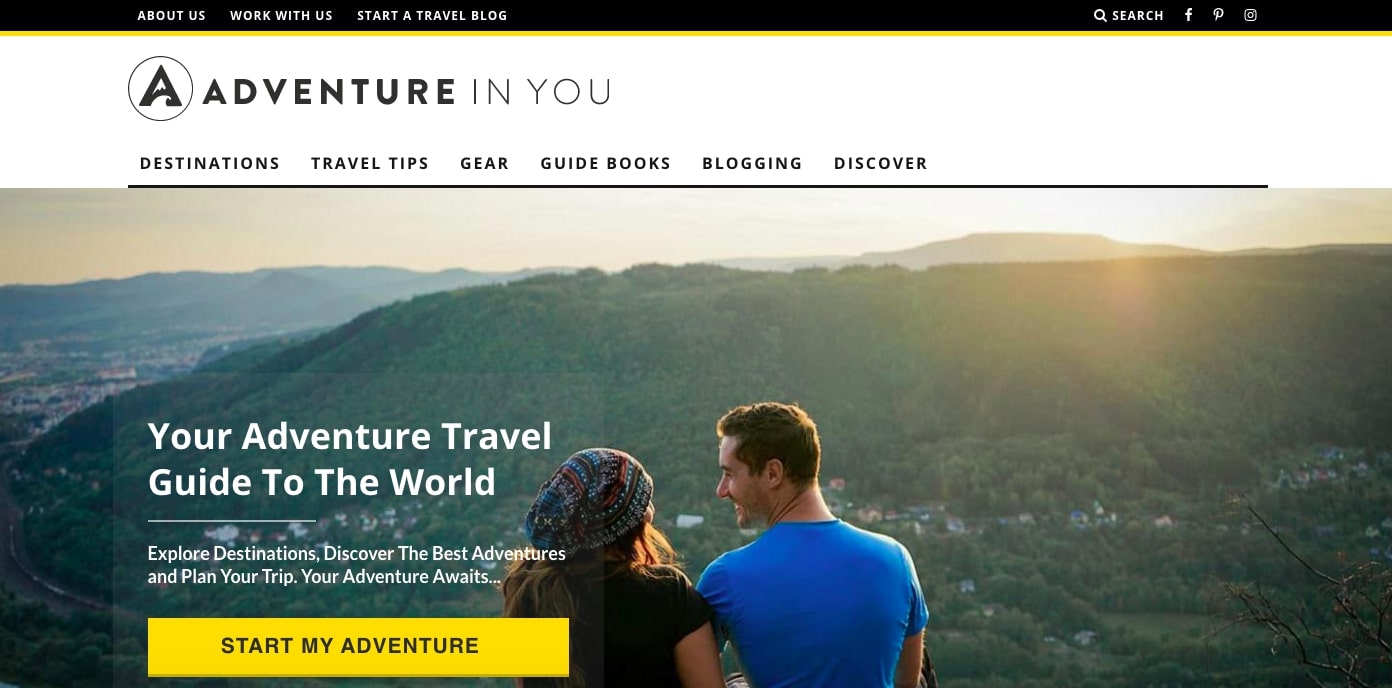
Today, my partner Tom and I run Adventure In You, one of the top 25 travel blogs in the world.
Not only do we get more than 500,000 visitors each month, but we’ve also turned our blog into a full-time business which allows us to live the life of our dreams and travel the world!

Blogging changed our lives… and we believe it can change yours too.
You just have to take the first step.
If you want to start your own blog but aren’t quite sure where to begin, this complete guide on how to start a blog will equip you with everything you need to know (and everything I wish I had known when I started!).
- What is a Blog?
- Why Start a Blog?
- How to Start a Blog in 5 Easy Steps
- Step 1: Decide What You're Going to Blog About
- Step 2: Pick a Blog Name
- Step 3: Choose the Right Blogging Platform
- Step 4: Get Hosting and Register Your Domain Name
- Step 5: Set Up Your Blog & Launch It!
- Bonus Tips for Starting a Blog
- I’ve Set up My Blog, What’s Next?
What is a Blog?
The word “blog” is thrown around a whole lot… but what exactly is a blog?
Well, a blog is a website that generally focuses on written content in the form of posts or articles. Blogs can be about literally anything in the world, from the news to crafting to celebrities to travel and beyond!
You can find a blog about pretty much any topic you can think of; just type the subject into Google and BAM, you’ve got loads of blogs to choose from.
In the past, blogs were typically written to be personal in nature — people sharing stories from their own lives and experiences. Wikipedia even classifies blog posts as “informal diary-style text entries.”
But that’s not really the case anymore.
I mean, no offense to Carole, but who really wants to read about your family Thanksgiving from start to finish?
Instead, these days the most popular and successful blogs are authority sites that show expertise in a particular topic, sometimes with personal stories intertwined.
The successful blogs are the ones that get millions of visitors each month and are able to earn from their sites as well… But we’ll get into that in a bit.
Why Start a Blog?
When I say that blogging changed my life, I’m not exaggerating.
It took me from working a 9-to-5 office job to living a life of full-time travel, adventure, and ultimate freedom.
I’m talking villas in Bali, scuba diving in Mexico, trekking in Nepal… the list goes on and on!
Thanks to my blog, I’m able to live the life I’ve always dreamed of while growing a business that I truly love.
Who knew a website could be so powerful?

On a basic level, a blog can be a place to write about something you’re passionate about, share information with readers, and help others who may have the same problems that you are experiencing or have overcome.
In fact, since most of the world turns to the internet when they need information, the majority of people end up on blogs to find solutions.
Get this: more than 409 million people view more than 20 billion blog pages each month.
Even crazier, every month, there are more than 77 million new comments left by readers, proving once again that blogging isn’t dead.
Apart from being able to share your passions or provide solutions to others, a blog can also earn you money, whether it’s to have a little cash on the side or fully fund your lifestyle.
In fact, when done correctly, a blog can earn you six figures!
No, that’s not a typo.
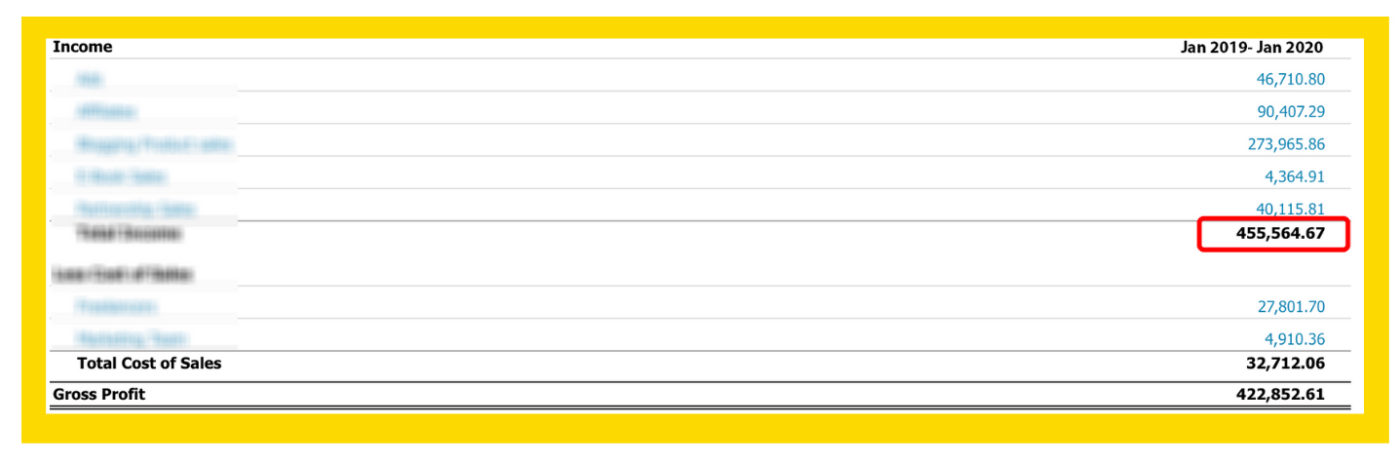
In 2019, we earned over $450,000 just from our blog.
And you know what? We’re not alone in making this kind of money from blogging.
According to this 2019 Professional Content Creator Survey, 39.3% of the bloggers surveyed make between $500 and $2,000 a month, while 16.4% make between $2,000 and $5,000!
The same survey also noted that around 20% of bloggers make anywhere between $5,000-$15,000… each month!
Beyond this, earning from a blog gives you the freedom to not only work on your own schedule but also the freedom to work remotely from anywhere in the world, if you want to.
If you’re still not convinced, let me tell you that starting a blog is easy.
I mean, it takes a lot of work to develop it into something successful and grow it into a business, but at the most basic level, getting a blog up and running does not take too much work.
Starting a blog is really not as difficult as you think. (It’s also not as expensive as you think!)
If you’ve always wanted to start a blog, I recommend that you grab a cup of coffee and follow these instructions on how to start a blog in 5 steps.
How to Start a Blog in 5 Easy Steps
If you’re sitting at home thinking to yourself “how do I even go about starting a blog?”, here are 5 easy steps that will get your new blog up and running in a single afternoon!
- Decide on your blogging niche
- Pick your blog name
- Choose the right blogging platform
- Get blog hosting and register your domain
- Set up your blog and launch it.

Step 1: Decide What You’re Going to Blog About
Deciding what to blog about is one of the biggest decisions you’ll make when starting a blog.
While you can blog about pretty much anything in the world, it’s best to choose a niche or specific focus to build your site around.
Are you interested in luxury travel? Italian cooking? At-home workouts? Puppy training? No matter what it is, choosing a specific topic is key to publishing strong content and developing authority on that subject.
While the niches above are perfectly fine, we recommend going even deeper (keep on reading below as we show you exactly how to do this.
To pick the best niche for your blog, you’re going to want to combine what you’re passionate about, with what you’re skilled at, geared towards one target audience.
If you’re passionate about your niche, chances are you’ll have engaging content and will enjoy working on your blog as well.
The more authoritative and skilled you are in your niche, the easier it will be to build credibility with the content you post!
However, the most important thing to keep in mind when choosing your niche is to make it specific.
I can’t emphasize this enough.
If you choose a broad topic for your blog like travel or cooking or food, you’re going to get lost in the sea of bigger and better blogs that already exist in that niche.
But if you hone in on your topic and make it specific, you have a much better chance of standing out.
In our Blogging Fast Lane course, we teach our students how to do this through the idea of a Blue Ocean, inspired by the business strategy created by W. Chan Kim and Renee Mauborgne.
According to them, there are two types of oceans in any type of business: a Blue Ocean and a Red Ocean.
Red Oceans are made up of oversaturated markets filled to the brim with competition, making it hard for new people to enter. On the other hand, a
Blue Ocean is where you’re able to carve out a sub-niche that is so unique and specific, you’ve created your own space in the market.
Here’s an example of what I mean about creating a Blue Ocean in blogging.
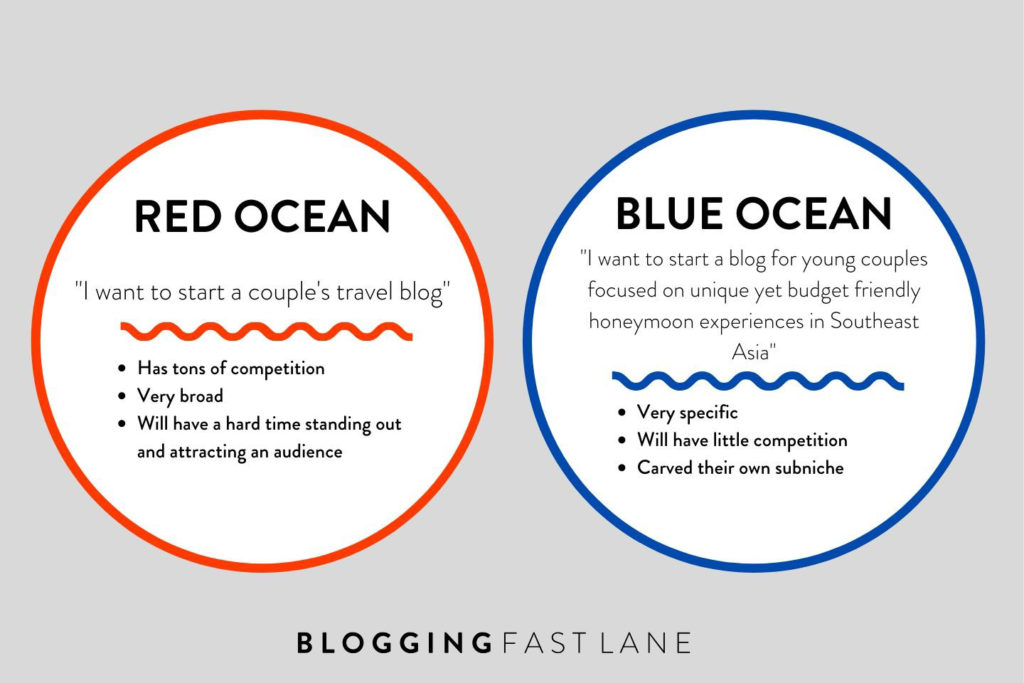
When you apply this approach to blogging, using the Blue Ocean method will allow you to:
- Get your articles ranking on Google faster
- Attract a loyal audience more easily
- Publish content that you KNOW your readers are going to love
If you want to learn exactly how to find your Blue Ocean, make sure to attend our free training where I walk you through the process step-by-step!
Step 2: Pick a Blog Name
Picking a name for your blog is the second step to take after deciding on your niche.
Your blog name is something that will stay with you and become your brand, so it should be something you won’t get sick of after 2 months of seeing it constantly.
However, with that in mind, I know some people who get so consumed in choosing a name…that they end up not taking action at all!
Remember, a name is just a name.
There are so many huge companies out there like Uber, Sony, Ikea who created a brand for themselves using just made up words!
If you want to see which blog names are available, click this link.
Top Tips for Choosing the Perfect Name for Your Blog
Choose a name that will grow with you
This is a big one – don’t start with a name that you may outgrow at some point in the future.
Think about it, while it may be tempting to start a blog called Young Broke Traveler, what happens when you get a little older and start making some money?
Try to avoid choosing adjectives that put you in a box. Instead, choose a name that you can grow with and stick to.
A good name should tie into your Blue Ocean and also resonate with readers, allowing people on the internet to easily recognize that your blog is the place they want to be.
By naming your blog in this way, you’re planning for the long term and setting yourself up for success, especially when it comes to partnerships and sponsorships for your blog down the road.
No Cliches!
Another tip for naming your blog is to avoid cliches. As well as it might fit with your blog, chances are there is a bigger blog with a monopoly on the cliche so you can bet they’ll be dominating the search results, not you.
Choose a unique name, something that isn’t heard every day when it comes to your topic. It’ll really help you stand out from the rest of the noise online.
Chances are, blog names like Tasty Kitchen, The Smart Investor, etc. are all popular names with established brands.
Make It Memorable
One last tip is to choose something that will stick in people’s minds. A catchy name will do your blog wonders as people will find themselves gravitating back to it time and time again.
Avoid adding numbers, hyphens, or mis-spellings to the name. Keep it simple but witty.
At a branding seminar I attended once, they told us that when choosing a name, you should follow the mom test.
Here’s how to run the mom test.
When you come up with something, give your mom a ring and tell her you’re starting a blog and the name of it. If you have to spell it out for her and she keeps on saying, “Huh? What was it called? Let me get something to write it down…” then you know your name isn’t a memorable one.
Need more guidance on how to pick a name? Watch this video until the 10:13 mark!
Step 3: Choose the Right Blogging Platform
A blogging platform is a service or software that you’ll need in order to publish content on your blog. It’s a type of content management system (CMS) that will allow you to publish both static pages and blog posts/articles on your site.
There are dozens of blogging platforms out there that allow users to set up and customize their blog.
Some are free, some are paid, some are ultra-complex while some are fairly straightforward and simple.
In the sections below, I will discuss the difference between free vs. paid platforms and which ones I personally recommend.
Free vs Paid Blogging Platforms
Using a free blogging platform means their domain gets included with yours so it will look something like myblog.blogspot.com.
It also means that whichever host you choose has a portion of control over your blog. They can delete it if they like or the platform could disappear entirely… How are you going to build your empire like that?
If you’re hoping to make money, you should go with a self-hosted blog, one that you fully own.
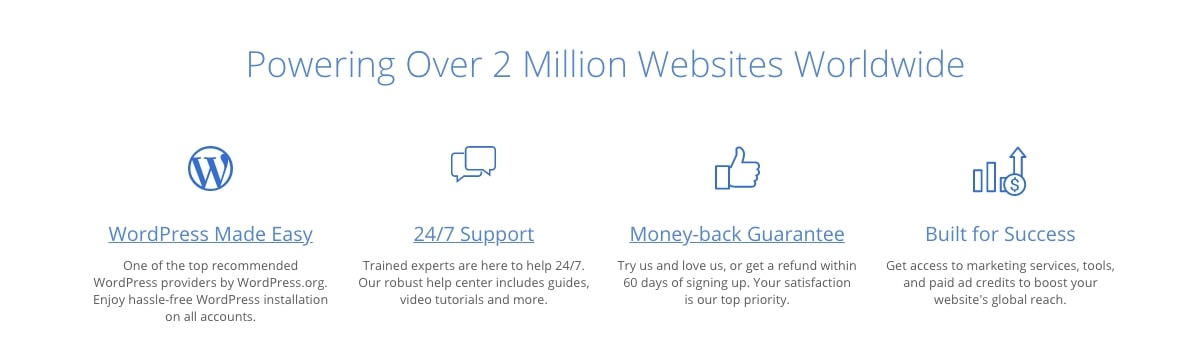
In general, WordPress.org is the best place for self-hosted blogs.
And the best part? It’s totally free!
You just need to just to purchase hosting, which is basically where your blog is going to live on the internet. (More on this later!)
Important: When choosing your blogging platform, don’t get confused between WordPress.com and WordPress.org. If you want to set up a self-hosted blog, make sure you start your blog using WordPress.org which is completely free
Why Choose WordPress
Although there are other blogging platforms out there, we recommend using WordPress.org.
While there’s a bit of a learning curve to it, once you get the hang of it, it’s actually really user-friendly and an incredibly powerful platform.
Yes, there are easier options than WordPress but if you want to have full control over what your blog looks like and what you can do with it, it’s worth learning.
So why do we love WordPress so much?
One reason we love WordPress is that there are thousands and thousands of free plug-ins and themes that allow you to customize and power up your blog in any way imaginable.
If you’re someone like me and not super tech-savvy, this is key because plug-ins allow you to do tons of technical edits without a shred of coding knowledge… which is awesome.
WordPress is also great for search engine optimization (SEO) which is one of the main reasons why so many bloggers flock to the platform.
Basically, SEO drives traffic to your blog by boosting your position in search engine results.
As the WordPress platform is written using standard compliance high-quality code with semantic markup, it means that the content on WordPress is very search-engine-result-friendly.
And since it’s awesome when it comes to SEO, it’s also the prime platform for monetizing your blog. In simple terms, good SEO means more traffic to your blog. And more traffic to your blog means more money earned.
If you’re hoping to build a business from your blog eventually, WordPress is the place to do it.
And if that’s not enough to convince you, this statistic might:
More than 35.7% of websites on the internet are WordPress.org sites. That means that more than a third of all websites are using this platform!
It’s by far the most popular platform for blogs, and since that’s the case there’s a huge network of support online if you run into any trouble. I’m talking an individual support forum for just about any problem you could have with WordPress! It makes figuring it out on your own so much easier.
Step 4: Get Hosting and Register Your Domain Name
Hosting: Where your blog is stored on the internet and what allows people to access it online.
Domain: The name of your website; the unique URL or .com address that leads people to your blog.
At this point, you’re probably wondering “So when do I actually get my own blog?”.
Well, that happens when you set up your domain and find somewhere to host your blog.
Your domain is typically the same as your blog name (ours is adventureinyou.com), and it’s the address used to locate your site.

Generally, domains go for about $10 per year and registering a domain name ensures that no one else can set up a website with the same name as yours.
If you get your hosting through Bluehost, you also get your domain name for FREE which means you don’t need to purchase it from an external website.
A domain goes hand-in-hand with hosting which is what actually allows your blog to be accessed through the internet.
Hosting is what allows your website to load up when someone clicks a link to your blog or types in your URL. It also keeps your files in a safe and secure place.
Disclosure: This page contains affiliate links, meaning we get a commission if you decide to make a purchase through any of the links, at no cost to you.
Our Hosting Recommendation: Bluehost
When it comes to choosing hosting for your blog, in our opinion, for those that are starting out, Bluehost is one of the BEST and most affordable options.
Not only are they one of the most used and most trusted hosting network, but they’re also the least expensive (with our discount!) — the perfect choice for beginners.
Another reason we love Bluehost is they have great customer service, with personable representatives who can help you with technical problems.
Finally, if you don’t want to take the internet’s word for it — take ours. We personally use Bluehost for a few of our personal websites (including this blog you’re now on) and haven’t run into any problems so far!
Here are some other perks of starting a blog with Bluehost:
- Able to get hosting before deciding on a name
- FREE Domain
- Best value for money
- 24/7 customer support
- FREE 30-day Money Back Guarantee
- One-click WordPress install
Bluehost Discount
If price is a concern when it comes to starting your blog, don’t worry! With our discount, it couldn’t be cheaper to get and keep your blog live.
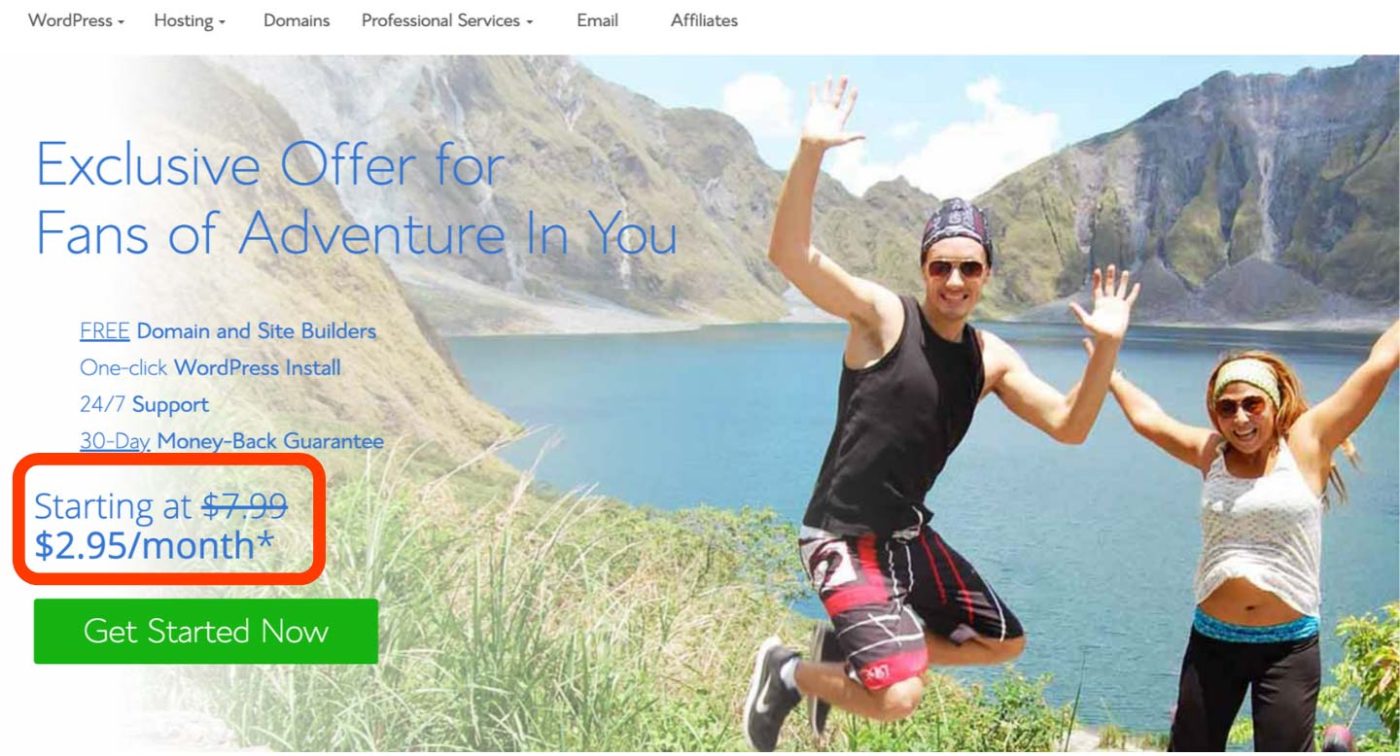
Because we love to recommend Bluehost to our readers, we’ve negotiated a special deal with them where you can start a blog for just $2.95 per month which is a 63% discount off the usual price!
Think about it…. that’s less than one cup of coffee each month to keep your blog up and running. Worth it, or worth it?
Note: We are not sponsored by Bluehost. We pay to host our blog just like everyone else but since we are so happy with our experience, Tom and I are thrilled to recommend them! Click here to get your blog started with Bluehost to see what I mean.
How to Set Up Blog Hosting
To make things as easy as possible for you, we’ll walk you through how to set up hosting with Bluehost.
First thing’s first: click the “Get Started Now” button to begin the sign-up process.
Next, you’ll be taken to a page when you’ll be able to sign up for hosting and choose a plan.
Choose a Bluehost Plan
Bluehost has three different packages: Basic, Plus, and Prime.
If you’re on a budget and just starting out, the Basic plan will suit your needs.
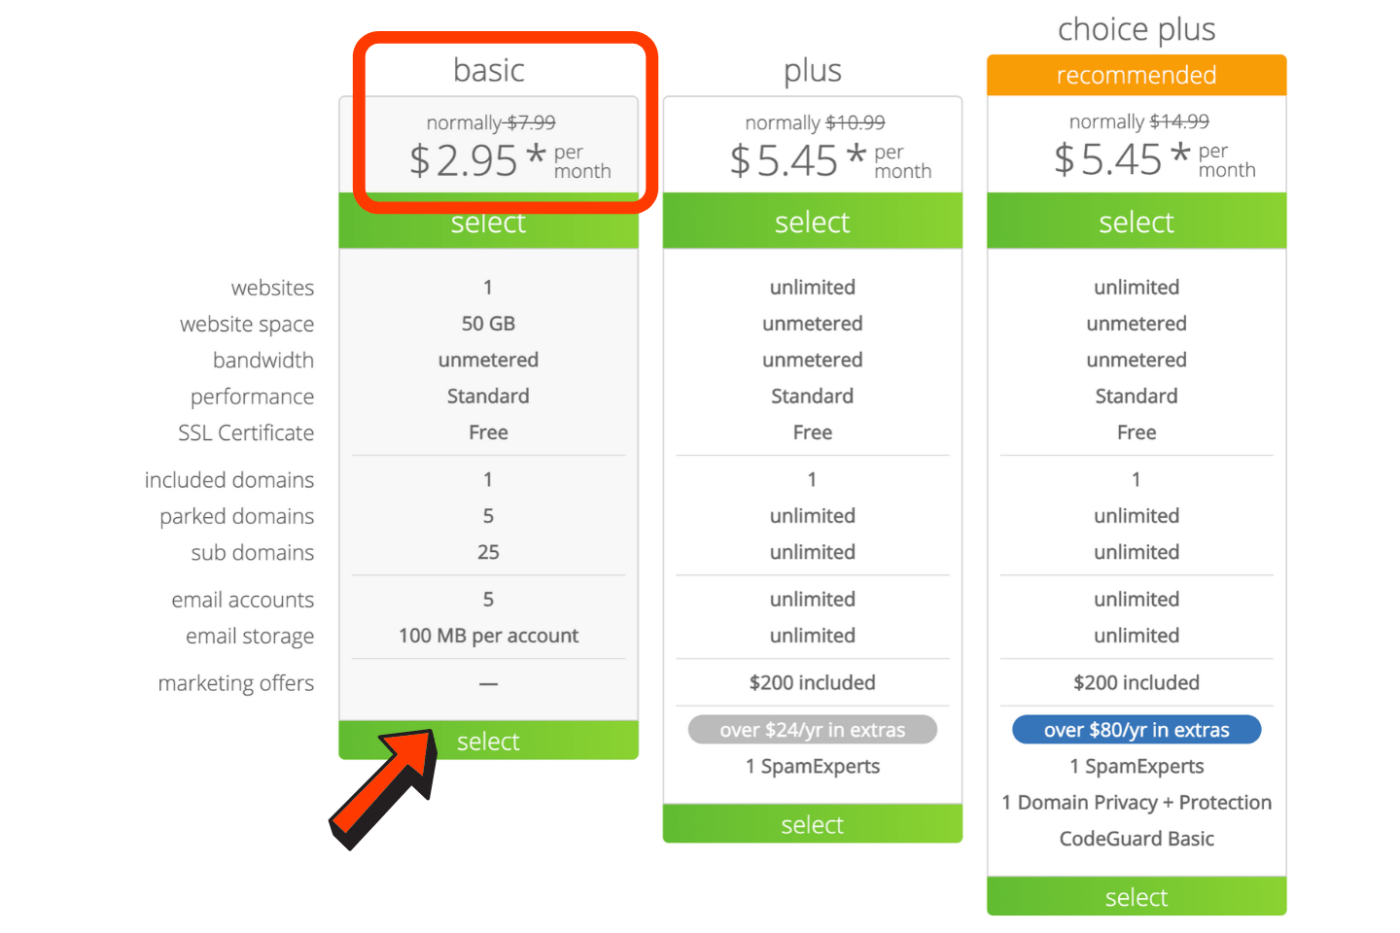
Getting your hosting using their 36-month package is the best deal and is the most budget friendly hosting options out there.
We personally don’t recommend getting any of the ad-ons.
Once you’ve decided on a plan, click “Select”.
If you’re a more visual learner, check out this video with everything you need to know or keep reading for our step-by-step instructions.
Video on How to Set Up Blog Hosting
Register Your Domain Name
Now’s the time where you’ll get to choose your domain name!
Remember that with Bluehost you don’t have to pay extra to register your domain — it comes included with your package.
This is a fun part but can be a bit scary too… What if you don’t have a name in mind?
Not to worry! One thing we love about Bluehost is the feature that allows you to pick a domain name later on if you’re stuck choosing a name right now. No stress.
If you want to put off choosing a name, just click “I’ll create my domain later” at the bottom of the screen.
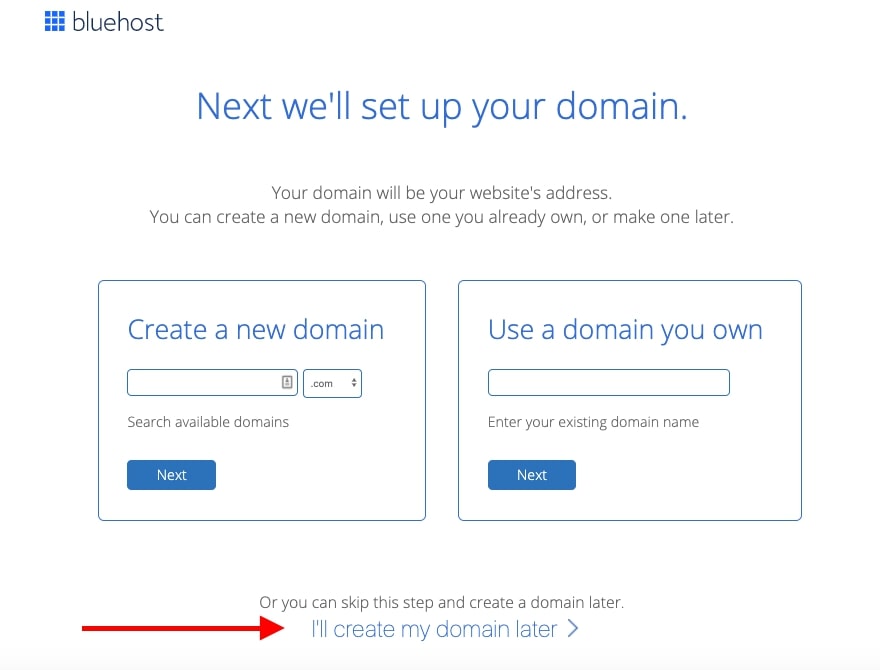
However, if you do have a name in mind, go ahead and type your name in the box on the left under “New Domain”. You’ll also be able to choose the ending of your blog, but I highly suggest you stick to “.com” from the dropdown menu.
Once that’s finished, you’ll create your account and pay.
After that, you’ll get to review the package you selected and decide if you want any extras to go along with it.
As I mentioned, the Basic plan will suit your needs if you’re just starting out and on a budget. Getting this for 36 months (3 years) will give you the lowest rate!
If you’re only able to commit to just 12 months in the beginning, that’s okay, but keep in mind that you’ll be spending more per month if you opt for a shorter plan.
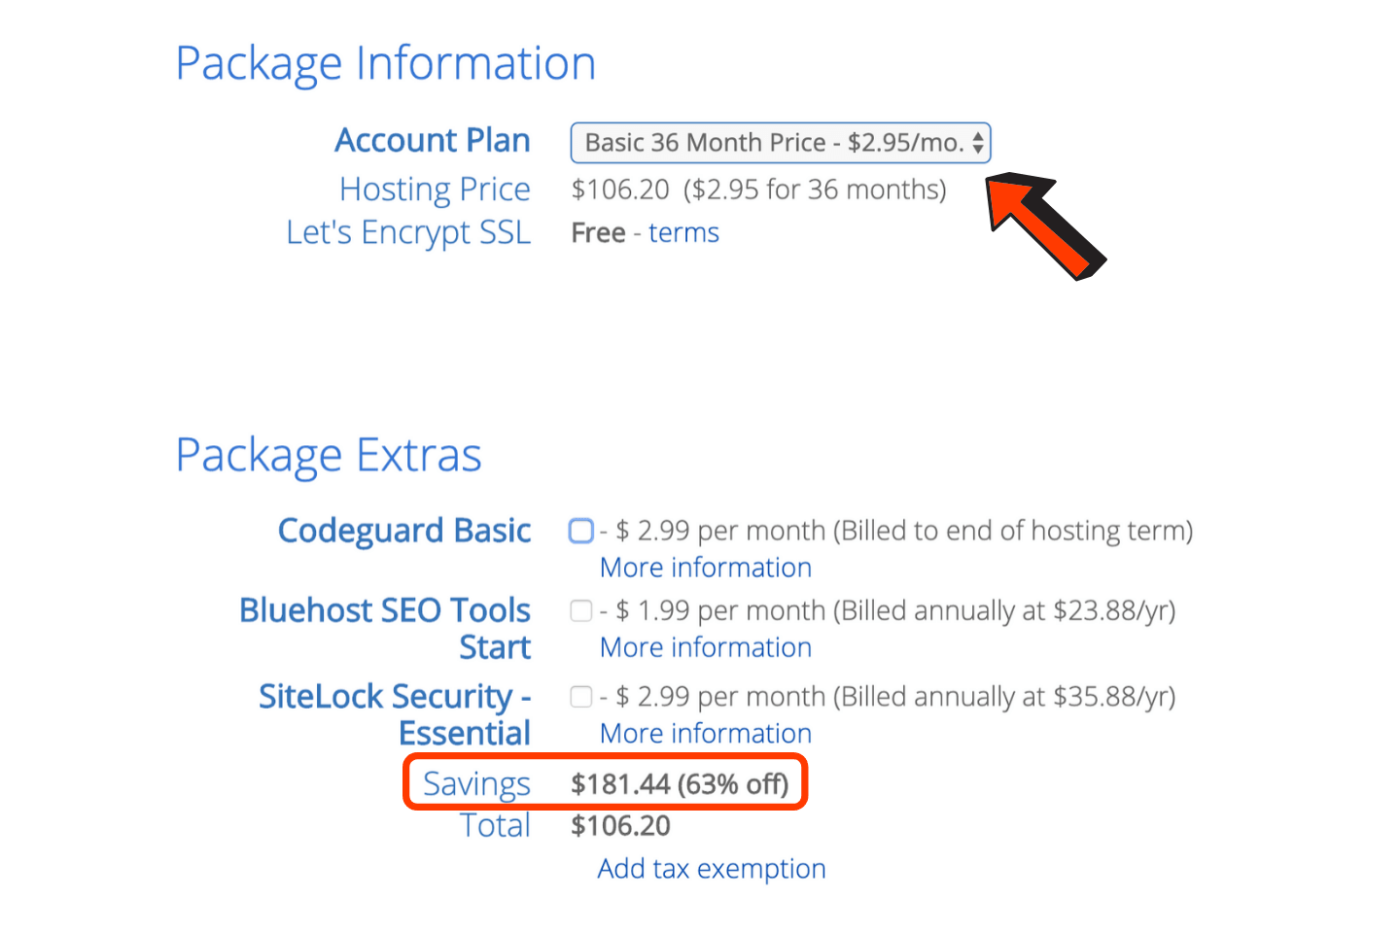
As you can see from the image above you can get 63% (total savings of $181.44) using our discounted Bluehost link.
After double-checking your package information, go ahead and enter your credit card information.
Check the box asking if you’ve read and agree to Bluehost’s Terms of Service, and then press submit!
Note: Keep in mind that our discount may vary depending on Bluehost’s own promotions and taxes may be added at the end, depending on what country you’re from/in. Since this is a local government tax, it can’t be avoided but in some countries, there will be no tax at all! If there is one, it shouldn’t exceed $25.
Voila, you’re now ready for the fun part – setting up your blog!
Step 5: Set Up Your Blog & Launch It!
Now, after you’ve gone through the domain set up process, it’s time to wrap things up by setting it up through WordPress!
Here are all the steps you’ll need to follow.
Install WordPress
One of the best things about using Bluehost is that it’s designed to be compatible with WordPress so installing it on your domain is super easy.
Once you finish signing up with Bluehost, you’ll be guided on how to install WordPress.
Once you’re in your Bluehost dashboard, choose “My Sites” from the sidebar.
Then click the “Create Site” option and it will guide you through the process of getting started.
Input the site name and tagline. Then, choose the correct domain from the dropdown menu and there you have it, WordPress is installed!
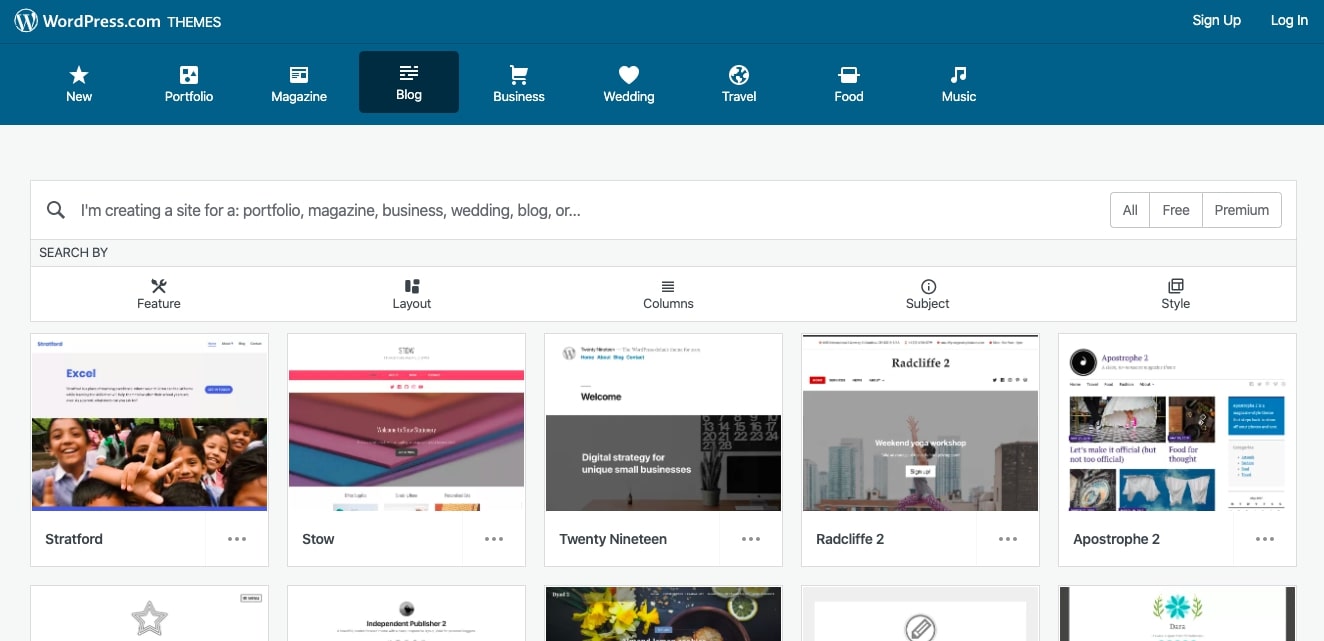
Pick a Theme
Once you have WordPress installed, it’s time to pick a theme for your site.
There are literally thousands of WordPress themes to choose from, so keep hunting until you find the right one.
That being said, you can always change your theme further down the road, but it’s nice to have something workable right off the bat.
A WordPress theme is basically the design of your blog and how it will look. No, you don’t need to know how to code to have a beautiful-looking website — thank you, themes!
To start playing around with WordPress themes, first you’ll have to log into your admin account.
This can be accessed by going to yourdomain.com/wp-admin. From there, you’ll be prompted with a login screen where you can enter your credentials.
After logging in successfully, you’ll wind up on your WordPress dashboard, which can look like it has a lot going on, but it’s simple — I promise.
From here, navigate to “Appearance” on the sidebar and then click “Themes.”
On this page, you’ll see WordPress themes for the specific year which are pre-installed and easy to set up.
But to access the gold mine of themes out there, you’re going to want to click “Add New” on the top bar next to Themes and you’ll be greeted with tons of options to choose from.
If you don’t feel like sorting through all of the themes, click the “Feature Filter” to choose specific elements that are important to you. Once you apply the filters, you’ll have all the themes that fit your fancy.
Once you find a theme you like, you can click the thumbnail and get a preview of what your blog will look like when it’s applied. After finding a great fit, click “Install”, then “Activate”, and you’ll be all set!
Not sure what to look for when choosing a theme? Read our guide on how to choose a WordPress theme for your blog.
Free vs. Premium Themes
In our personal opinion, we recommend taking the leap to purchase a premium theme straight away. While there are tons of free themes out there, most of them are pretty limited when it comes to customization.
Use “Live Demo” to preview how some look.
Again the choice is yours but most bloggers start with a free theme and then, later on, end up buying one.
Plus, for a one-time purchase of $40 to $60 (what most themes cost), it’s totally worth it to not have to spend hours trying to get your free theme to look professional.
Some other beautiful, light themes that are perfect for blogs are Astra and Generatepress, both of which allow you to customize and combine it with page builders.
Aside from Themeforest, Divi from Elegant Themes is also a pretty popular theme as it literally allows you to customize EVERYTHING.
Themeforest has LOADS of different themes to choose from so we recommend checking it out and finding something that you like.
A few popular ones on Themeforest are:
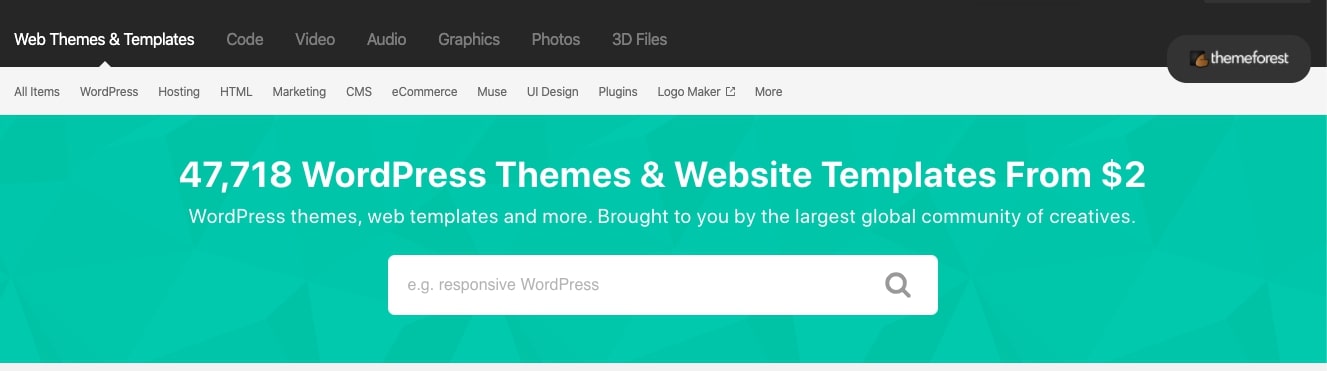
We personally use a premium theme called 15Zine from Themeforest and love the look and feel of our blog! Even if you don’t love this one specifically, you can still preview premium themes the way you can for free ones, so you don’t have to commit to the purchase before seeing how it looks.
For more WordPress theme recommendations, check out these articles:
- Best Elementor Themes
- Best WordPress Travel Blog Themes
- Best WordPress Lifestyle Blog Themes
- Best WordPress Food Blog Themes
- Best Free WordPress Blog Themes
Whatever you do, choose a theme that’s eye-catching but more importantly, easy to navigate. The most important thing is that visitors are able to move around your site easily — if they can’t, they’ll leave!
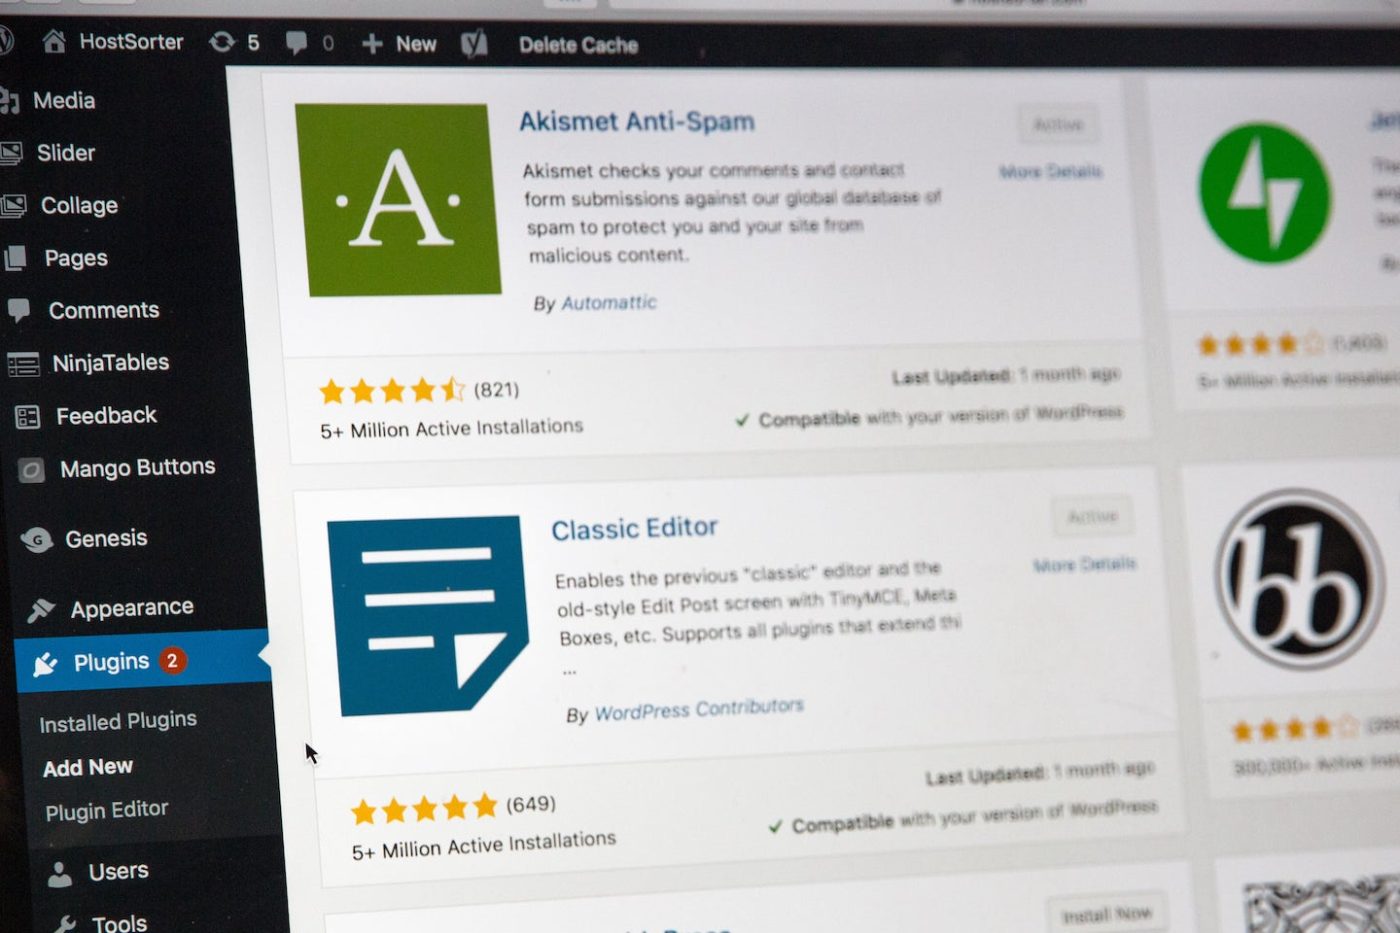
Recommended Plug-ins
One of our all-time favorite things about WordPress is all the plug-ins available to make your blog special.
A WordPress plug-in is a small bit of code that “plugs in” to your blog and allows you to add new features or extend the functionality of your blog. With plug-ins, you can further build and customize your blog to fit your needs! And they’re easy to use: you simply install, activate and then configure the plug-in as needed.
Plug-ins allow you to create things like a “Facebook Like” box in your sidebar or get people to subscribe to your email list. They allow you to craft contact boxes throughout your site, link up to your social media, and even sell goods and products from your blog.
Yes, there is basically a plug-in for everything!
While it’s easy to get swept away in the world of WordPress plug-ins, there are a few essentials you should consider installing right away.
Tip: To install plug-ins, head to your WordPress dashboard, navigate to “Plug-ins” on the sidebar and then click “Add New.” Then search for the ones listed below, click download and then activate! Easy.
Yoast SEO
Yoast is a plug-in that you can use to help get your blog seen on the internet. If your blog has great SEO (search engine optimization), it’s more likely that it will be at the top of search engine results, leading to more people to visit your site!
There’s a lot that goes into SEO, but Yoast helps with optimizing some of the technical components of your blog and is one of the most important plug-ins you can have on WordPress.
WordFence
We jumped on the WordFence train late, and boy do I wish we had installed it earlier. Basically what this does is add a layer of security to your website to prevent hackers from penetrating it.
You might not think it’s important now but at some point down the road, you are going to be thanking yourself that you have it!
All you have to do is install WordFence and they’ll do the rest.
W3 Total Cache
While this plug-in is pretty technical, you should keep in mind that the best-performing websites are the ones that load and populate information the fastest.
W3 Total Cache helps speed up your website and decrease load times which is important for site performance and SEO.
Monster Insights
Monster Insights is a super awesome tool that allows you to connect to Google Analytics and see where your users are clicking. With this plug-in, you’ll be able to see things like how many people are reading your posts, what links they click on, and other elements like that.
It’s easy to use and a nice way to see this kind of information, without getting overly technical.
Google Analytics
Finally, to track your blog’s growth and traffic, Google Analytics is a must. By installing this plug-in, you’ll be able to see key data such as how many visits you get, where your audience comes from, and what articles they’re landing on the most.

Customize Your Blog
Next, it’s time to customize your blog.
Customization can look like anything from changing around the colors and font to deciding what you want the general layout to look like.
The best part about WordPress is it’s so customizable. With most themes, you can easily make your blog look sleek, eye-catching, and easy to navigate.
While there are hundreds of ways to make your blog uniquely yours, here are the basic customizations that should be at the top of your list.
First, head into your theme and click “Customize” on your active theme.
Depending on the theme you’re currently running, your sidebar may look a bit different, but generally, you’re going to want to go into “Site Identity.”
From there, you can add the name of your blog and a tagline giving visitors a quick snippet of information about your site (nice, but not completely necessary). Then click “Save & Publish”.
With your theme, you can also edit the colors, graphics, menus, social icons and more! I recommend you give it a visit and play around a bit to see what you can come up with.
Add Necessary Blog Elements
There are some elements that every blog needs to make it feel complete.
Obviously elements vary from blog to blog, but in our opinion, these are the most necessary ones to have when you launch your blog.
About Page
One of the most important elements of your blog is your About page. This lets people know who’s running the show, why they should trust you, and any other information that’s pertinent to your blog.
While it’s great to be honest and open on your About page, you don’t have to write an entire book. A couple of paragraphs will do. Introduce yourself, let people know why you’re passionate about this subject, and why they should be reading your blog.
Contact Information
It’s also a good idea to have your contact information on your blog so that people can reach out.
Whether it’s a contact form at the bottom of your pages, a page dedicated to contact information or a combination of these elements, it’s nice to show your readers that they can reach out to you.
You’ll also want your contact information up so that any brands or parties interested in working with you can easily contact you!
Sidebar
Lots of great blogs also have sidebars to add extra elements. The sidebar shows up on all of your pages (but can be turned off when you don’t want it there!), giving you extra space for a quick bio, contact information, social media buttons, advertising, and more!
It’s a great way to section out the pages on your blog and give you room on your articles to post more than just content.
Content
And, of course, the most important element on your blog: the content!
While content should be the central part of your blog, it doesn’t happen overnight. Good content takes time to plan, research, develop, write, and edit. The process shouldn’t scare you, but it’s good to keep in mind that producing content takes time, so don’t stress if it’s taking you a little while to populate your blog.
We walk you through our own content creation process in our free training, so be sure to sign up for it if you want to learn the exact strategy that tripled our traffic in less than 12 months!
Tip: Don’t get too hung up customizing your blog trying to make it look perfect! For now, settle on the basics so that your blog can go live ASAP. You can always make changes down the road.
Bonus Tips for Starting a Blog
What I’ve covered so far are the basics when it comes to starting a blog.
I know it may seem like a lot but once you get going, the momentum will build and you’ll find that you’ve breezed through the process!
However, you’ll find that once you’ve finished up all the steps I’ve laid out above, there may be a few things missing. So here are some bonus tips for you blogging beginners.
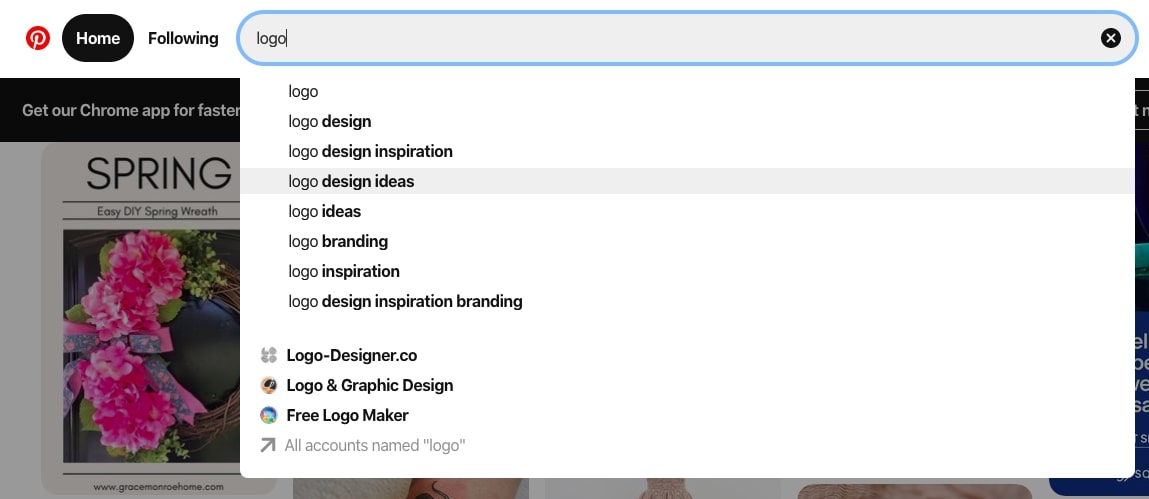
Invest in a Logo
A small but significant part of any blog is the logo. A logo is a quick glimpse into any brand in bite-sized form and becomes the way you’re recognized.
While you may not want to initially spend money having a professional design your logo, there are lots of online tools that walk you through creating one. If you’re feeling confident, take to Canva to design a logo on your own!
There’s great inspiration on Pinterest if you look up things like minimalist logo, nature logo, etc…
Another good option is to head to Fiverr to outsource the job to someone looking for freelance work. It’s a great place to connect with designers without a huge bill!
Register For Social Media
Social media is an extremely powerful tool when it comes to blogging — it allows you to connect with your audience, market yourself, and drive people to your blog.
After starting your blog, I recommend that you also register and park your social media domain names for your blog. Basically what this means is signing up for social media even if you don’t plan on using it so no one else can take your name.
Register and park on all the social media platforms you can think of: Facebook, Instagram, Pinterest, YouTube, Twitter, you name it. Just be sure that no one else can start an account using your name!
That said, here’s a word of caution: don’t get caught in the social media trap.
The social media trap is a common blogging mistake. It’s when you end up pouring tons of time into lots of different social media platforms and get caught up in likes, followers, and other vanity metrics that do not help your blog.

When we started Adventure In You, I was constantly posting on social media and super active on Instagram and Facebook.
We grew a huge following, but no one was actually going to our blog… and what good is social media for a blog if it doesn’t drive people there?
So, here’s my advice.
For the time being, you should focus on creating killer content for your blog, and once you have enough, then you can take to social media to promote your content.
And when that time comes, instead of spreading yourself thin, choose one channel where you can reach your main audience and rock it.
Sign Up For Our Free Training
One last bonus tip is to sign up for our FREE blogging training!
Shameless plug, I know, but if you’re looking for guidance on your blogging journey, we’ve put together an online training that walks you through everything you need to know to profit from your passions.
You’ll learn things like:
- Why you need a Blue Ocean for your blog
- How to earn money from your blog
- Our content strategy that tripled our traffic in under 12 months (that you can replicate!)
I’ve Set up My Blog, What’s Next?
Congratulations! You did it!
You have your very own blog… how does it feel? I remember how excited I was when we launched our blog — I couldn’t stop dancing around the room thinking about the fact that we had a blog of our own!
But now that you have it all set up, you must be thinking, “Well… what’s next?”
Build Your Authority Fortress
Now that you have your own blog, it’s time to start loading it up with content.
In our Blogging Fast Lane course, we teach our students an effective content strategy that we call building an Authority Fortress.
By writing a whole bunch of content around a central topic (your Blue Ocean), you’re able to establish relevance and authority in Google’s eyes.
Taking it a step further, when your content is structured into Authority Pillars, you’ll be able to build out tons of articles related to subtopics under your Blue Ocean. Plus, you’ll pretty much never run out of things to write about.
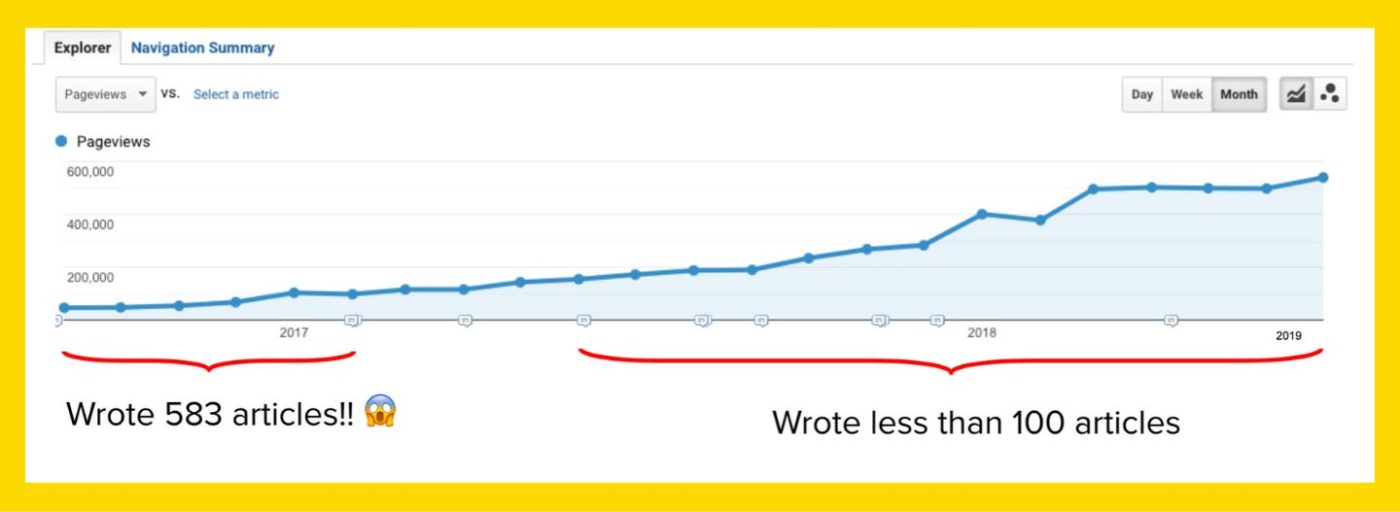
This method literally tripled our traffic in less than a year!
When you get to the point where you’re narrowing down specific article topics to write, one of the most important steps in building your Authority Fortress is doing your keyword research.
Keyword research is the process where you check how many people are searching for what you want to write about and what words they’re using to do it.
By researching this, you’re able to write articles surrounding certain keywords, giving your content an even better chance of being picked up by Google and pushed to the top of search results for greater traffic.
In our Blogging Fast Lane course, we walk you through our own methods of doing keyword research and give you the knowledge you need to do it yourself!
Learn How to Monetize Your Blog
And now the million-dollar question: So how do I make money blogging?
Well, it depends on what you want to do. You see, there are different ways to monetize a blog, all with their pros and cons.
One of the most popular ways for bloggers to earn is through affiliate marketing. This is the process of inserting product links with an affiliate code into your content, and then whenever someone makes a purchase using your link, you get a commission.
At Adventure In You, affiliate marketing is our jam.
We publish tons of packing lists, travel guides, product reviews, and hotel recommendations, all of which are intended to help solve our readers’ problems… and help us make affiliate commissions as well.
The best part about affiliate marketing is that it can be automated so that you are earning without doing anything! Seriously, you can make money from your blog even when you’re not working on it. Sounds like a dream come true, right?
Don’t believe me?
In 2018, Tom and I hiked to Everest Basecamp and during that time, we were offline for 3 weeks. Despite that, our blog still passively brought in $12,000 as we had built our blog into an Affiliate Machine.

We’ve pretty much mastered affiliate marketing and in our Blogging Fast Lane course, we teach you how to build an Affiliate Machine of your own.
Besides affiliate marketing, you can also do brand partnerships and sponsored content where companies will pay you to publish content about them on your blog.
You can also earn through display ads, creating digital products, and selling physical products — it just depends on the route you wish to go!
If you’re interested in learning more about how to monetize your blog, check out this article on proven strategies or watch the video below!
And there you have it! Everything you need to know when it comes to starting your own blog.
When it comes to building a blog, it’s all about the way you start it. If you set yourself up for success from the very beginning, you’ll have a much easier time growing and monetizing your blog later on down the road.
Now that you have your own blog, are you ready to move on to the next step in your blogging journey? We show you our exact methods of creating a successful blog from the get-go in our free training.

Like this Article? Pin it!